=Frequently Asked Questions
This page answers common questions about developing with Linux for ADSP-SC5xx processors. For additional support, visit the EngineerZone forum or check the GitHub issues.
How do I add packages to my Linux filesystem?
Adding Custom Packages
To add a package (for example, ethtool) to your target image, first locate the Yocto Project recipe through the OpenEmbedded Layer Index.
Method 1: Using local.conf (Recommended)
Add the package to your image by appending this line to conf/local.conf:
IMAGE_INSTALL:append = " ethtool"
Note
Always include a space before the package name when using :append to avoid concatenation with the previous entry.
Method 2: Using a Custom Recipe
Alternatively, add the package directly to your custom recipe file:
diff --git a/meta-custom/recipes-custom/images/adsp-custom-ramdisk.bb b/meta-custom/recipes-custom/images/adsp-custom-ramdisk.bb
index a98b1f9..e070e6f 100644
--- a/meta-custom/recipes-custom/images/adsp-custom-ramdisk.bb
+++ b/meta-custom/recipes-custom/images/adsp-custom-ramdisk.bb
@@ -6,6 +6,8 @@ IMAGE_INSTALL = " \
     packagegroup-core-boot \
     linux-firmware-fastboot \
     fastboot-listener \
+    ethtool \
"
DISTRO_FEATURES = " ram"
Build the Image
Build your image to include the new package:
bitbake adsp-custom-ramdisk
The package will be deployed into the Linux filesystem during the build process.
See also: Linux Kernel Development
How do I debug a SHARC application while running Linux on ARM?
Overview
When debugging SHARC applications using CrossCore Embedded Studio (CCES) while Linux runs on the ARM core, you must configure the debug session carefully to avoid interfering with Linux execution. Since the ARM core boots first and starts Linux, the system is already running when you connect the debugger.
Required Debug Session Settings
To debug SHARC cores safely while Linux runs on ARM:
Do not load preloads or applications to the ARM core - Prevents memory corruption
Disable processor reset - Keeps Linux running
Disable semihosting - Avoids interference with Linux system calls
Step 1: Do Not Load ARM Core Applications
Problem: By default, CCES attempts to load applications onto the ARM core, which overwrites the L2 and L3 memory used by Linux.
Solution: When creating the debug session:
Remove any preload or initcode binaries for the ARM core
Ensure no application is loaded to the ARM core
This preserves the memory regions reserved for Linux
Note
This assumes you’re using the default memory configuration or have correctly partitioned memory between cores. See Configuring System Memory.
Step 2: Disable Processor Reset on Reload
Problem: CCES resets the entire processor when starting a debug session, which erases Linux from memory.
Solution: In the debug session settings:
Uncheck “Reset on reload”
This allows the debug session to attach without resetting the system
Step 3: Disable Semihosting
Problem: CCES uses ARM Supervisor Call (SVC) instructions for host communication. Linux also uses these instructions for system calls, causing severe performance degradation or crashes when semihosting is enabled.
Solution: In the debug session settings:
Uncheck “Use semihosting”
This prevents the emulator from halting on every SVC instruction
Result: Linux continues running normally while you debug SHARC applications.
How do I use my own development repositories?
This guide explains how to configure your Yocto build to use custom Git repositories, allowing you to work with your own forks or private repositories.
Prerequisites
Ensure your host PC is properly configured: Setting Up Your Host PC.
Step 1: Download Source Code
mkdir ~/linux-dsp-own-repos
cd ~/linux-dsp-own-repos
mkdir bin
curl http://commondatastorage.googleapis.com/git-repo-downloads/repo > ./bin/repo
chmod a+x ./bin/repo
./bin/repo init \
   -u https://github.com/analogdevicesinc/lnxdsp-repo-manifest.git \
   -b main \
   -m release-5.0.1.xml
Note
Replace release-5.0.1.xml with your desired release version.
Step 2: Configure Manifest
Modify the repo manifest to point to your custom repositories for lnxdsp-adi-meta and lnxdsp-scripts:
cd ~/linux-dsp-own-repos/.repo/manifests/
Apply the following modifications to lnxdsp-repo-manifest:
diff --git a/default.xml b/default.xml
index 244bf04..45abdf8 100644
--- a/default.xml
+++ b/default.xml
@@ -5,12 +5,12 @@

   <remote fetch="https://git.yoctoproject.org/git" name="yocto"/>
   <remote fetch="https://github.com/openembedded" name="oe"/>
-  <remote fetch="https://github.com/analogdevicesinc" name="adigithub"/>
+  <remote fetch="$YOUR_REPO_PATH" name="customrepo"/>

   <project remote="yocto" revision="..." name="poky" path="sources/poky"/>
   <project remote="oe" revision="..." name="meta-openembedded" path="sources/meta-openembedded"/>
-  <project remote="adigithub" revision="main" name="lnxdsp-adi-meta" path="sources/meta-adi"/>
-  <project remote="adigithub" revision="main" name="lnxdsp-scripts" path="sources">
+  <project remote="customrepo" revision="main" name="lnxdsp-adi-meta" path="sources/meta-adi"/>
+  <project remote="customrepo" revision="main" name="lnxdsp-scripts" path="sources">
       <linkfile dest="setup-environment" src="setup-environment"/>
   </project>
Replace $YOUR_REPO_PATH with your Git server URL (e.g., https://github.com/yourorg or git://your-server.com).
Sync the repositories:
./bin/repo sync
Step 3: Configure Kernel and U-Boot Repositories
Point U-Boot and Linux kernel recipes to your custom repositories by modifying conf/local.conf:
# Add to conf/local.conf
UBOOT_GIT_URI = "git://$YOUR_REPO_PATH/u-boot.git"
UBOOT_BRANCH = "main"
KERNEL_GIT_URI = "git://$YOUR_REPO_PATH/lnxdsp-linux.git"
KERNEL_BRANCH = "main"
Replace $YOUR_REPO_PATH with your repository locations and adjust branch names as needed.
Step 4: Build with Custom Repositories
Configure your build environment and start building:
cd ~/linux-dsp-own-repos/
source setup-environment -m adsp-sc598-som-ezkit

# Build your target
bitbake adsp-sc5xx-minimal
Common build targets:
u-boot-adi- U-Boot bootloaderlinux-adi- Linux kerneladsp-sc5xx-minimal- Minimal root filesystem imageadsp-sc5xx-full- Full-featured root filesystem image
Benefits of using custom repositories:
Maintain proprietary modifications
Implement custom versioning and branching strategies
Enable CI/CD integration with your development workflow
Control access and review processes
How do I allocate a peripheral to the SHARC cores?
Understanding Peripheral Allocation
By default, all peripherals are allocated to the ARM core. The ARM core, as the booting processor, manages pinmux (pin multiplexing) configuration for all peripherals. Only one core should configure the pinmux to avoid conflicts.
Peripheral allocation is controlled through Linux device tree files, located in the kernel source at arch/arm/boot/dts (ARM) or arch/arm64/boot/dts/adi (ARM64). Each platform has:
A family-level device tree (e.g.,
sc59x.dtsi)A board-specific device tree (e.g.,
sc594-som-ezkit.dts)
Example: Default Configuration
Family-level device tree (sc59x.dtsi):
lp0: linkport@0 {
    compatible = "linkport0";
    interrupt-parent = <&gic>;
    interrupts = <GIC_SPI 117 IRQ_TYPE_LEVEL_HIGH>,
                 <GIC_SPI 118 IRQ_TYPE_LEVEL_HIGH>;
    clock-div = <1>;
    status = "disabled";
};
Board-specific device tree (sc594-som-ezkit.dts) enables the peripheral:
&lp0 {
    pinctrl-names = "default";
    pinctrl-0 = <&lp0_default>;
    status = "okay";
};
Allocating a Peripheral to SHARC
To allocate a peripheral to SHARC cores, modify the board-specific device tree. The ARM core still configures the pinmux but doesn’t interact with the peripheral otherwise.
Example: Allocating Linkport0 to SHARC
Step 1: Disable the peripheral in Linux by setting status = "disabled" in the board device tree:
&lp0 {
    pinctrl-names = "default";
    pinctrl-0 = <&lp0_default>;
    status = "disabled";
};
Step 2: Configure the pinmux for the peripheral using the icc (inter-core communication) driver:
&pinctrl0 {
    icc {
        icc_default: icc0@0 {
            adi,group = "lp0grp";
            adi,function = "lp0";
        };
    };
};
Step 3: Apply the pinmux configuration through the icc driver:
&icc0 {
    pinctrl-names = "default";
    pinctrl-0 = <&icc_default>;
    status = "okay";
};
Result: Linux configures the pinmux at boot but doesn’t access the peripheral. The SHARC core can use Linkport0 exclusively without interference.
Note
After modifying device trees, rebuild the kernel and deploy the updated device tree blob (DTB) to your target. The changes take effect on the next boot.
See also: Configuring System Memory for memory partitioning between cores.
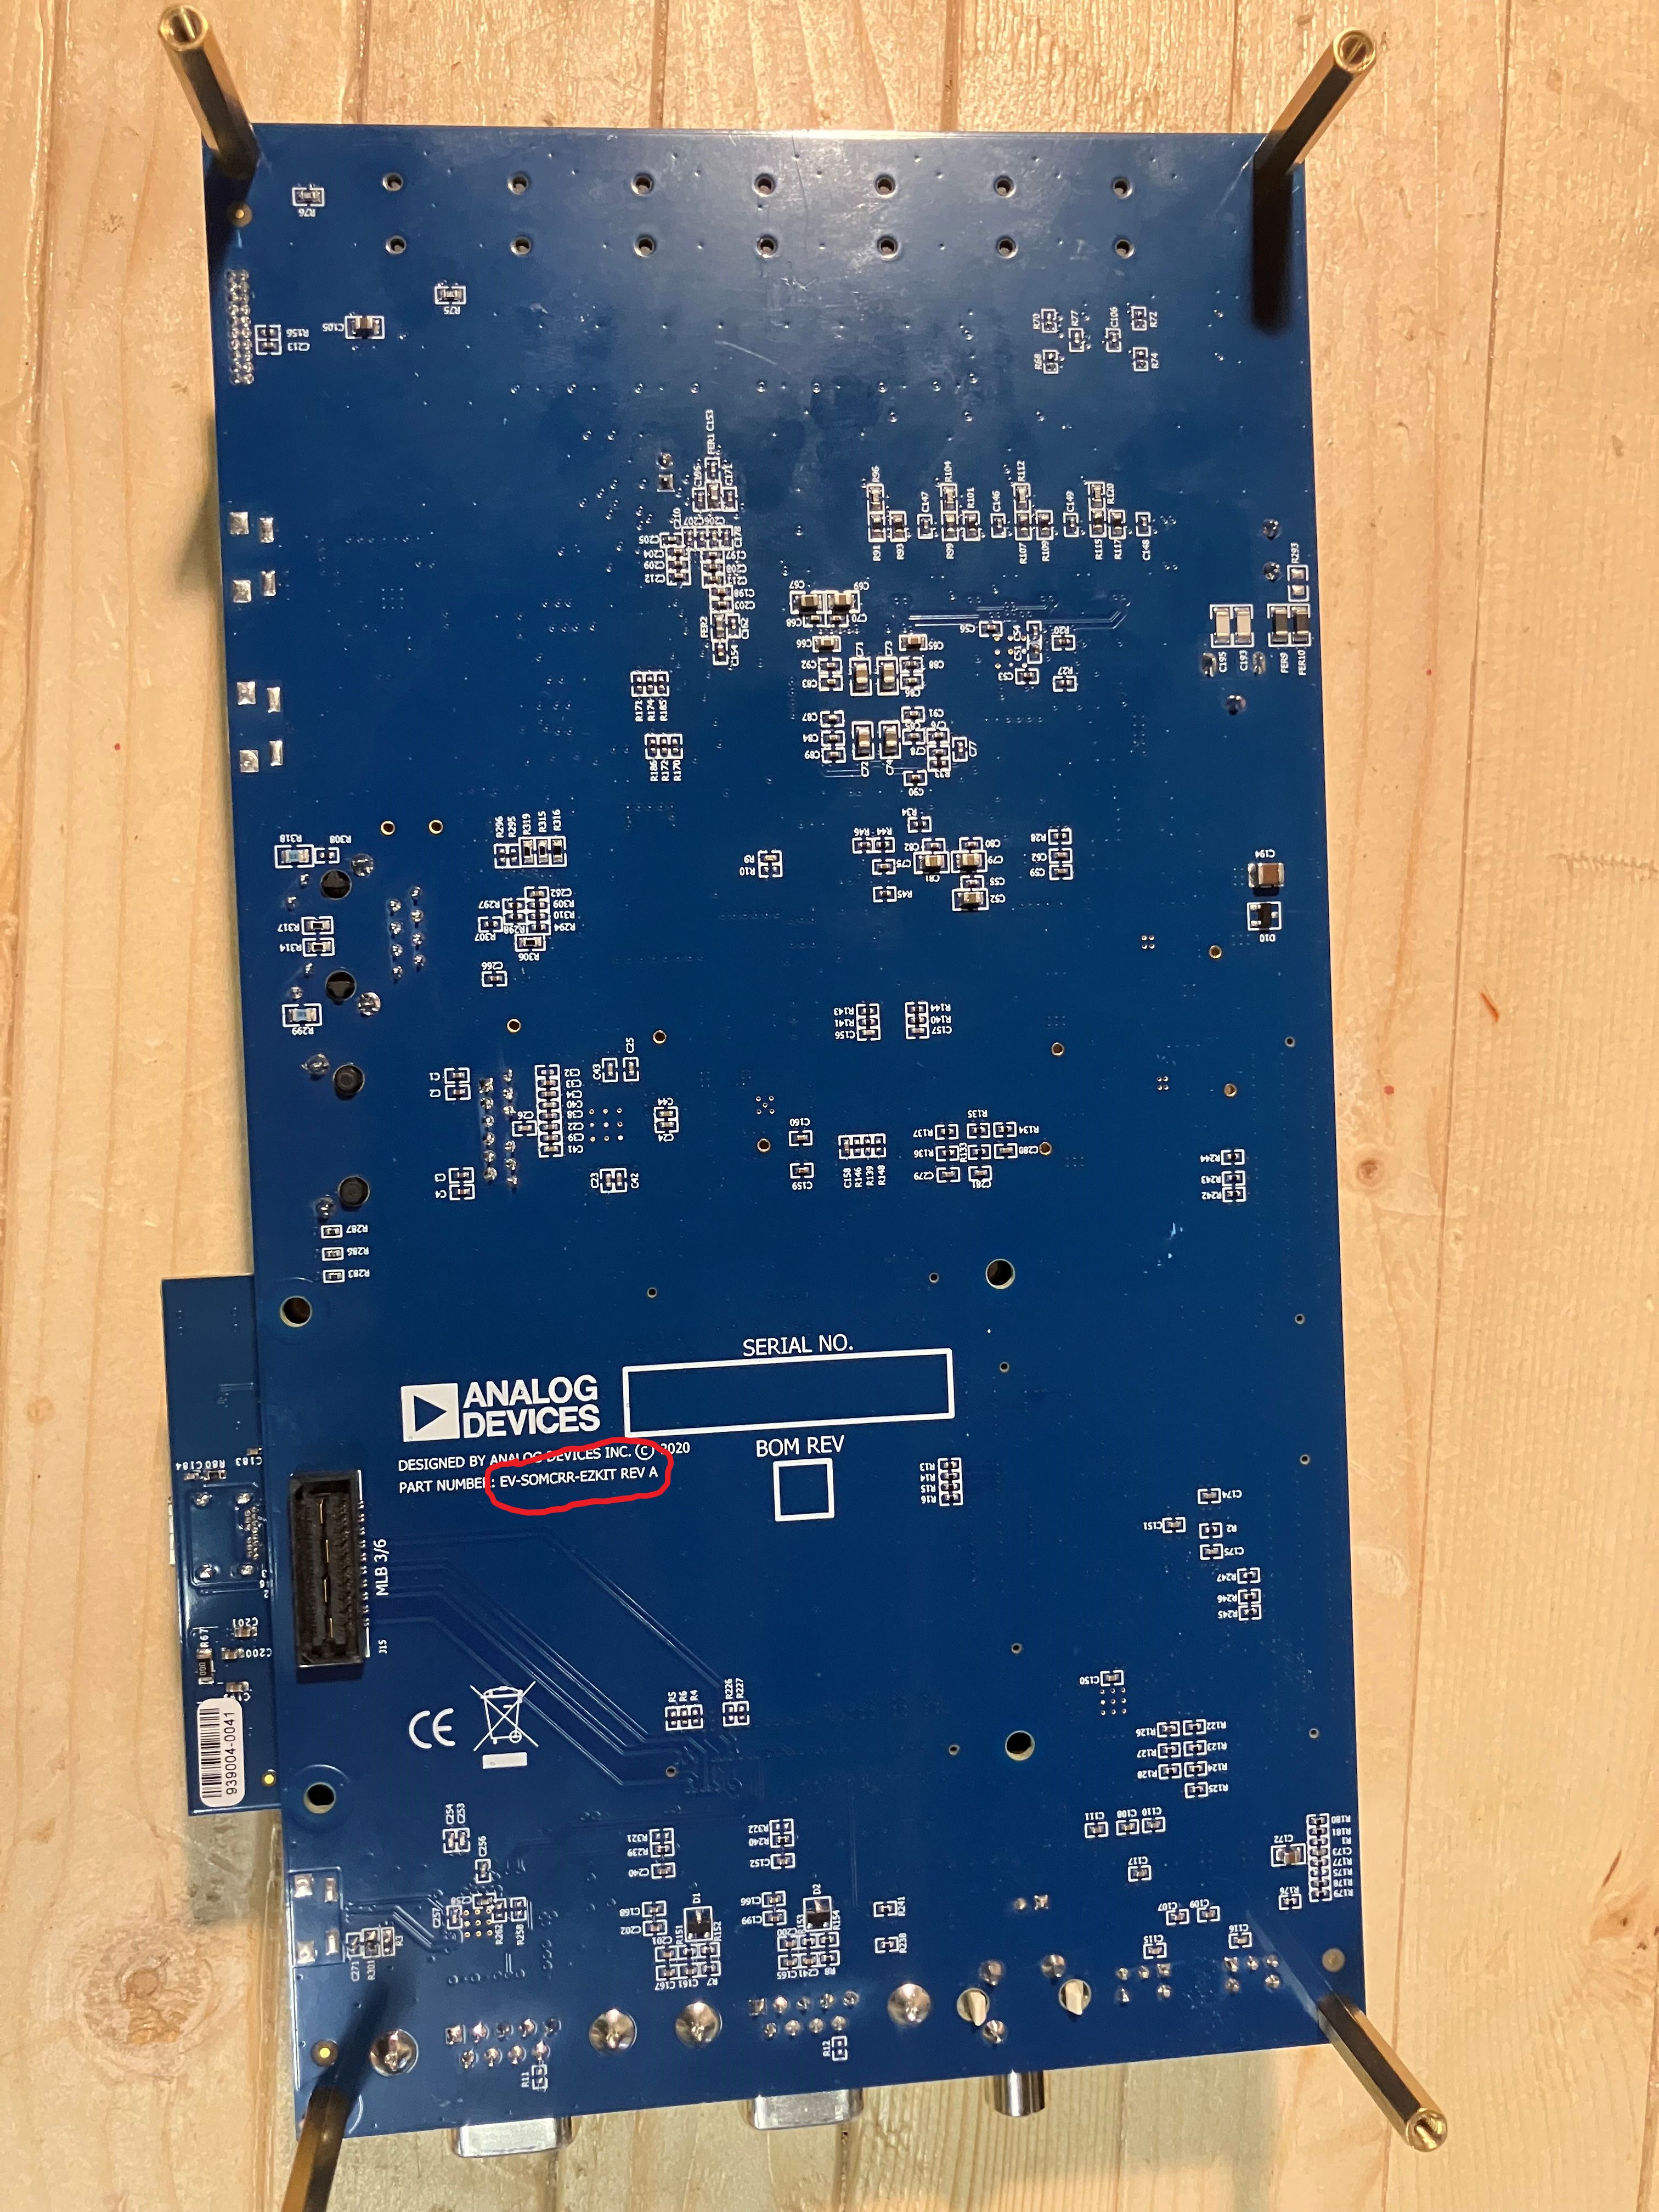
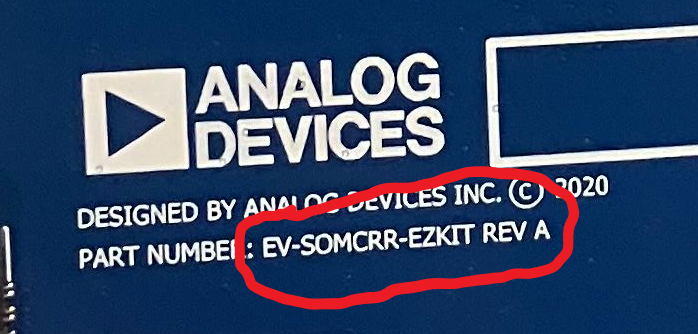
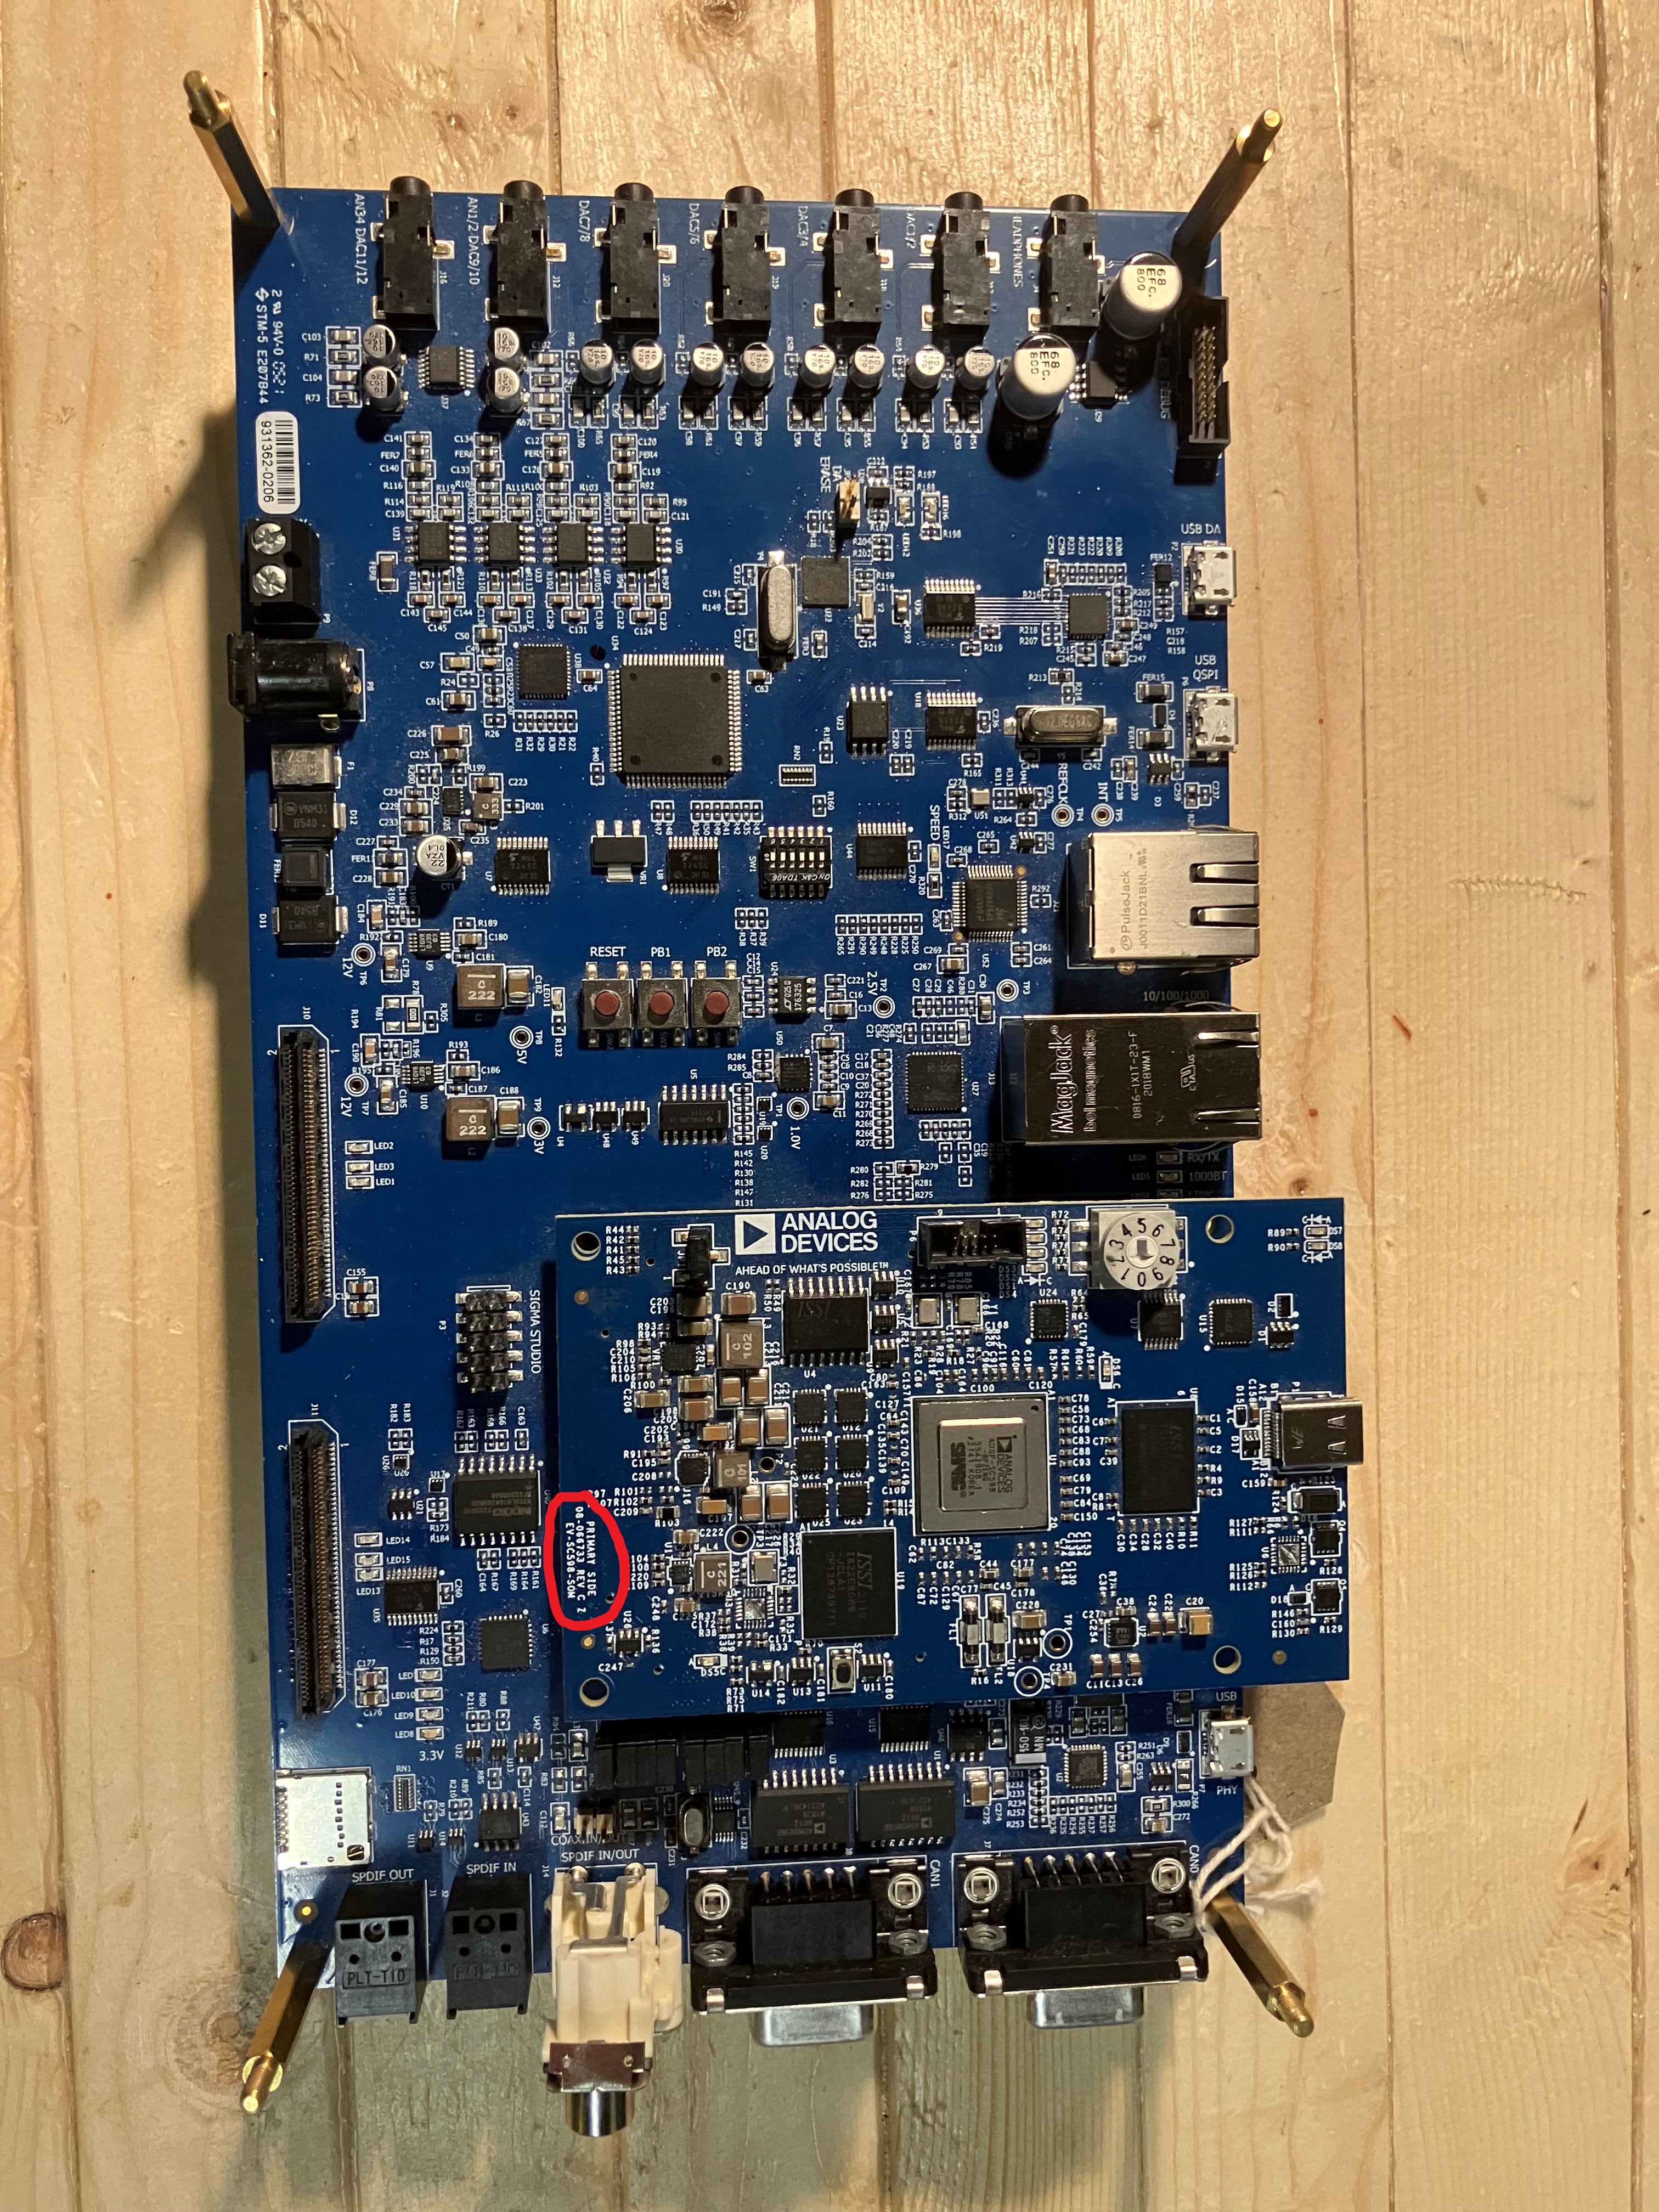
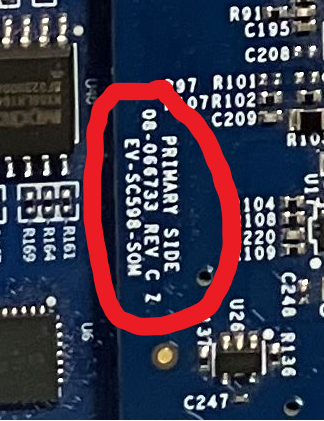
How do I identify my SOM and Carrier board revisions?
SOM Board Revision
The revision number is located on the top side of the SOM board, on the opposite side from the USB UART port connector.
Carrier Board Revision
Revision numbers are on the bottom part of the carrier board.