Aion EVB Initialisation
This section provides guidance on how to successfully setup and initialise the Aion Evaluation Board and accompanying Interposer Board. We require the Aion Eval Board to provide the External BSYNC signals to each of the Triton Development Platforms. Triton is setup to operate at 26.4 Gbps JESD rate so this requires 12.5 MHz BSYNC frequency to be set (26.4 Gbps / 66 / 32x decimation = 12.5 MHz).
Hardware Requirements
For a deep dive on the EVAL-ADF4030, we suggest you review the product home page, the link is shared at the bottom of this page.
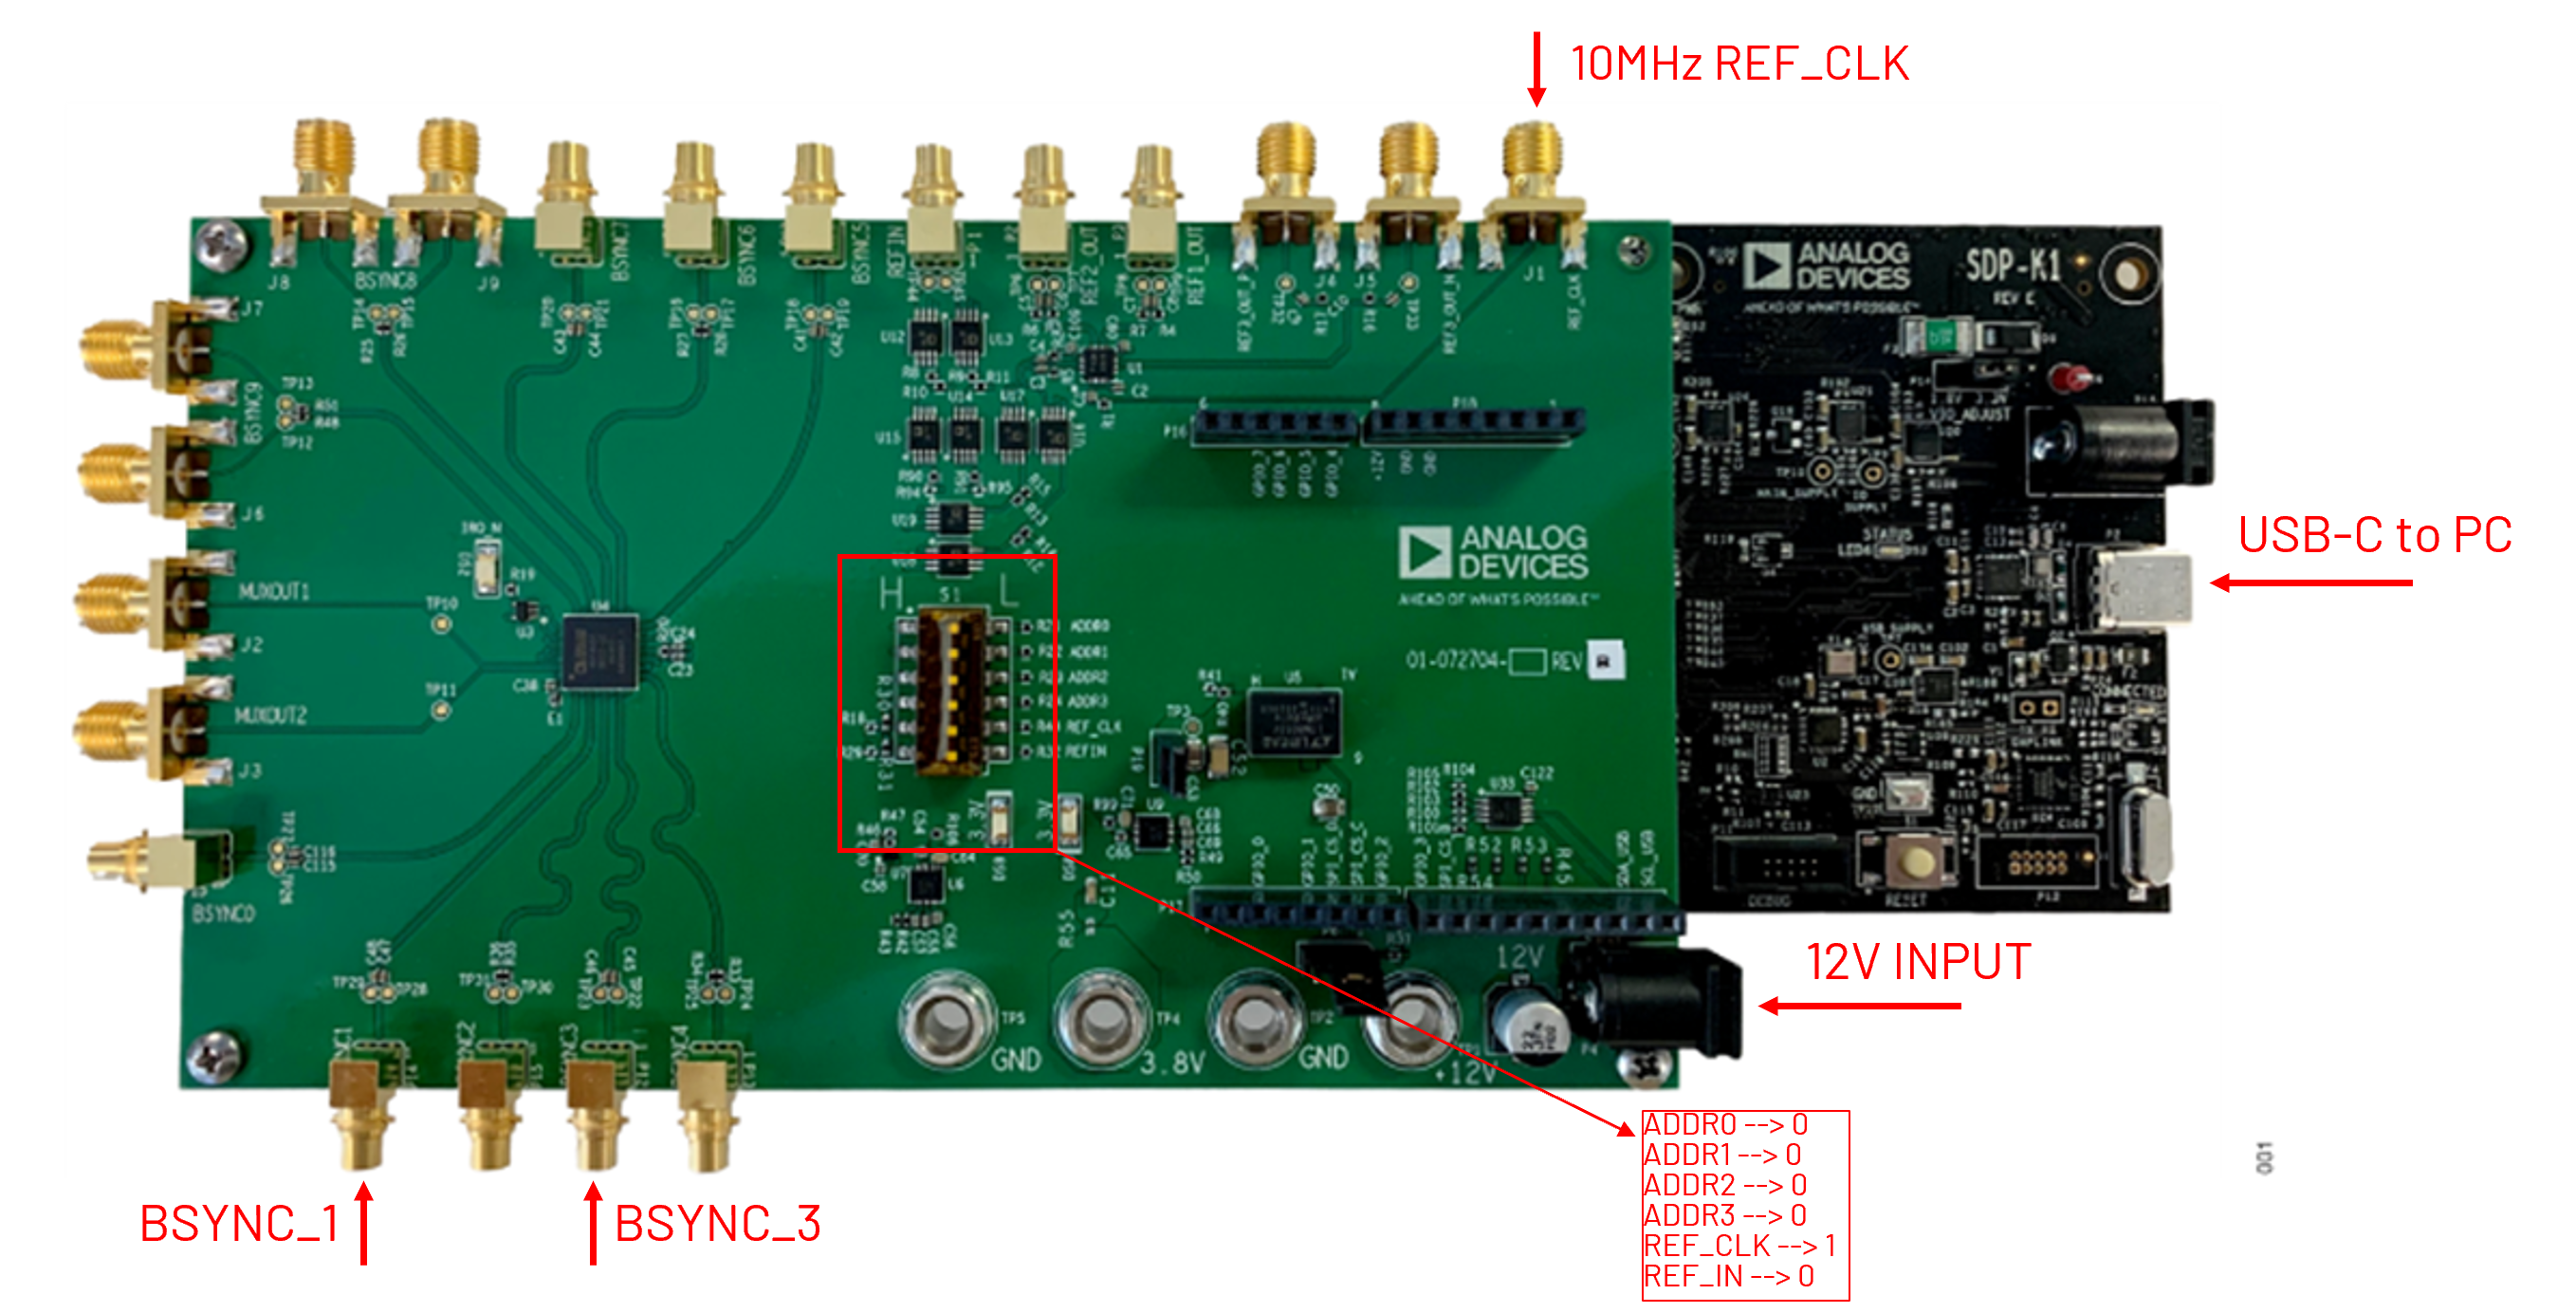
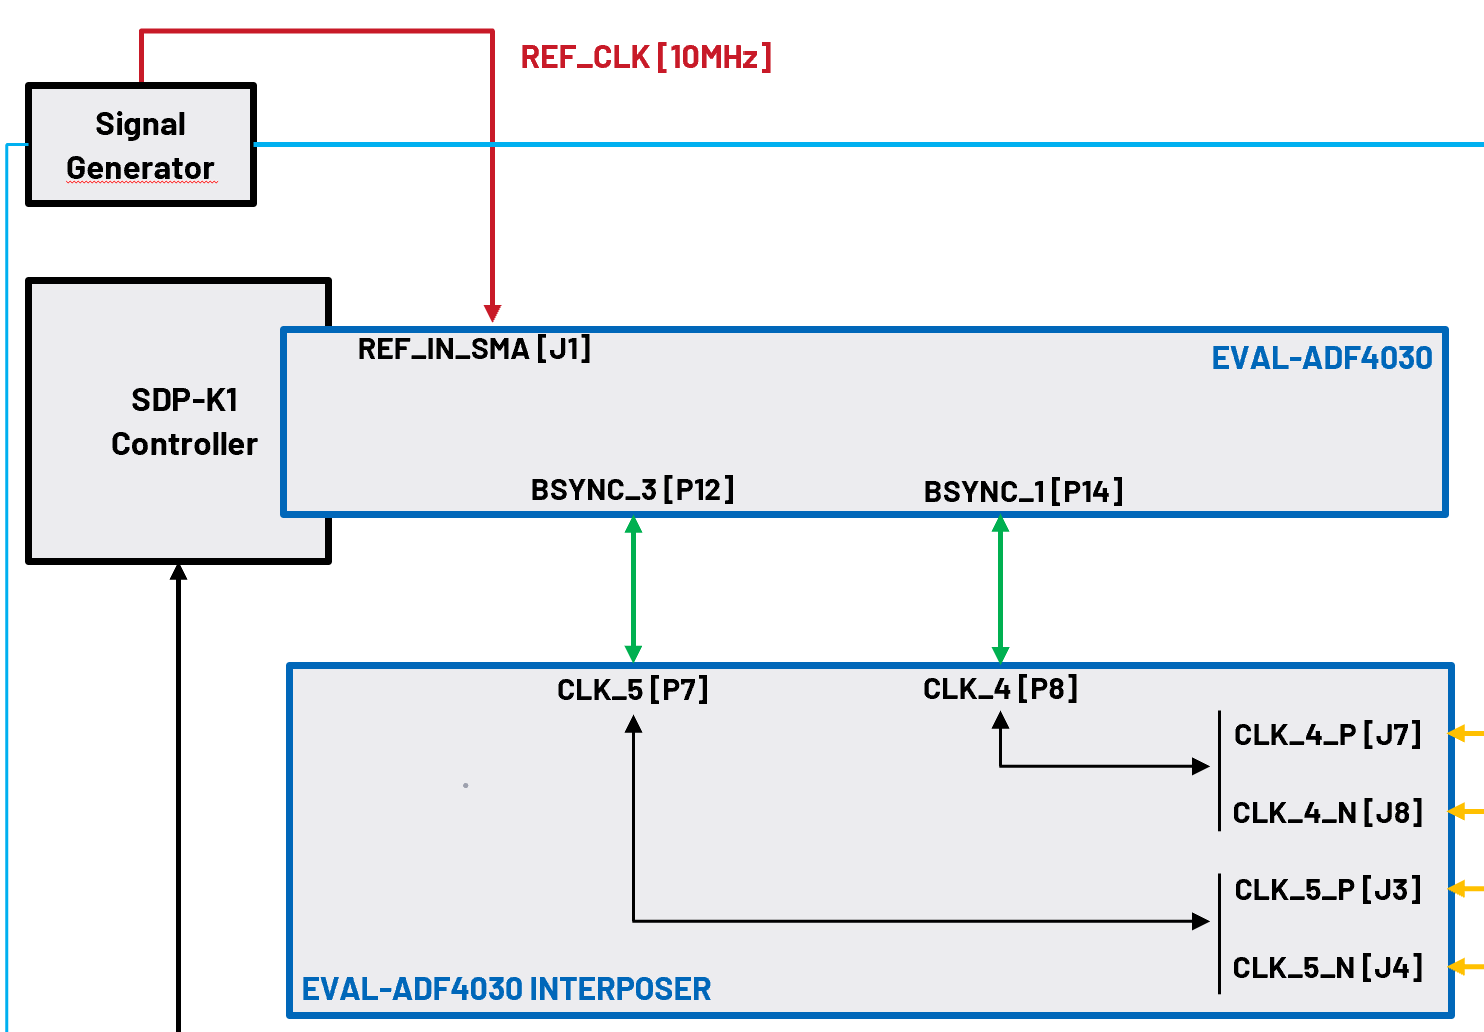
As shown in the picture below, we require five connections to the EVAL-ADF4030 & SDP-K1 control board and ADF4030 Interposer Board:
On the SDP-K1:
There is a USB-C connection which needs to be connected to the control PC
This will allow the Python software to control the system
On the EVAL-ADF4030, we will connect:
10MHz REF_CLK from the Signal Generator supplying the 400MHz to the Triton Platforms (this can be the 10MHz_REF BNC from the rear of most signal generators)
12V DC Input using the supplied DC Adaptor with the evaluation kit
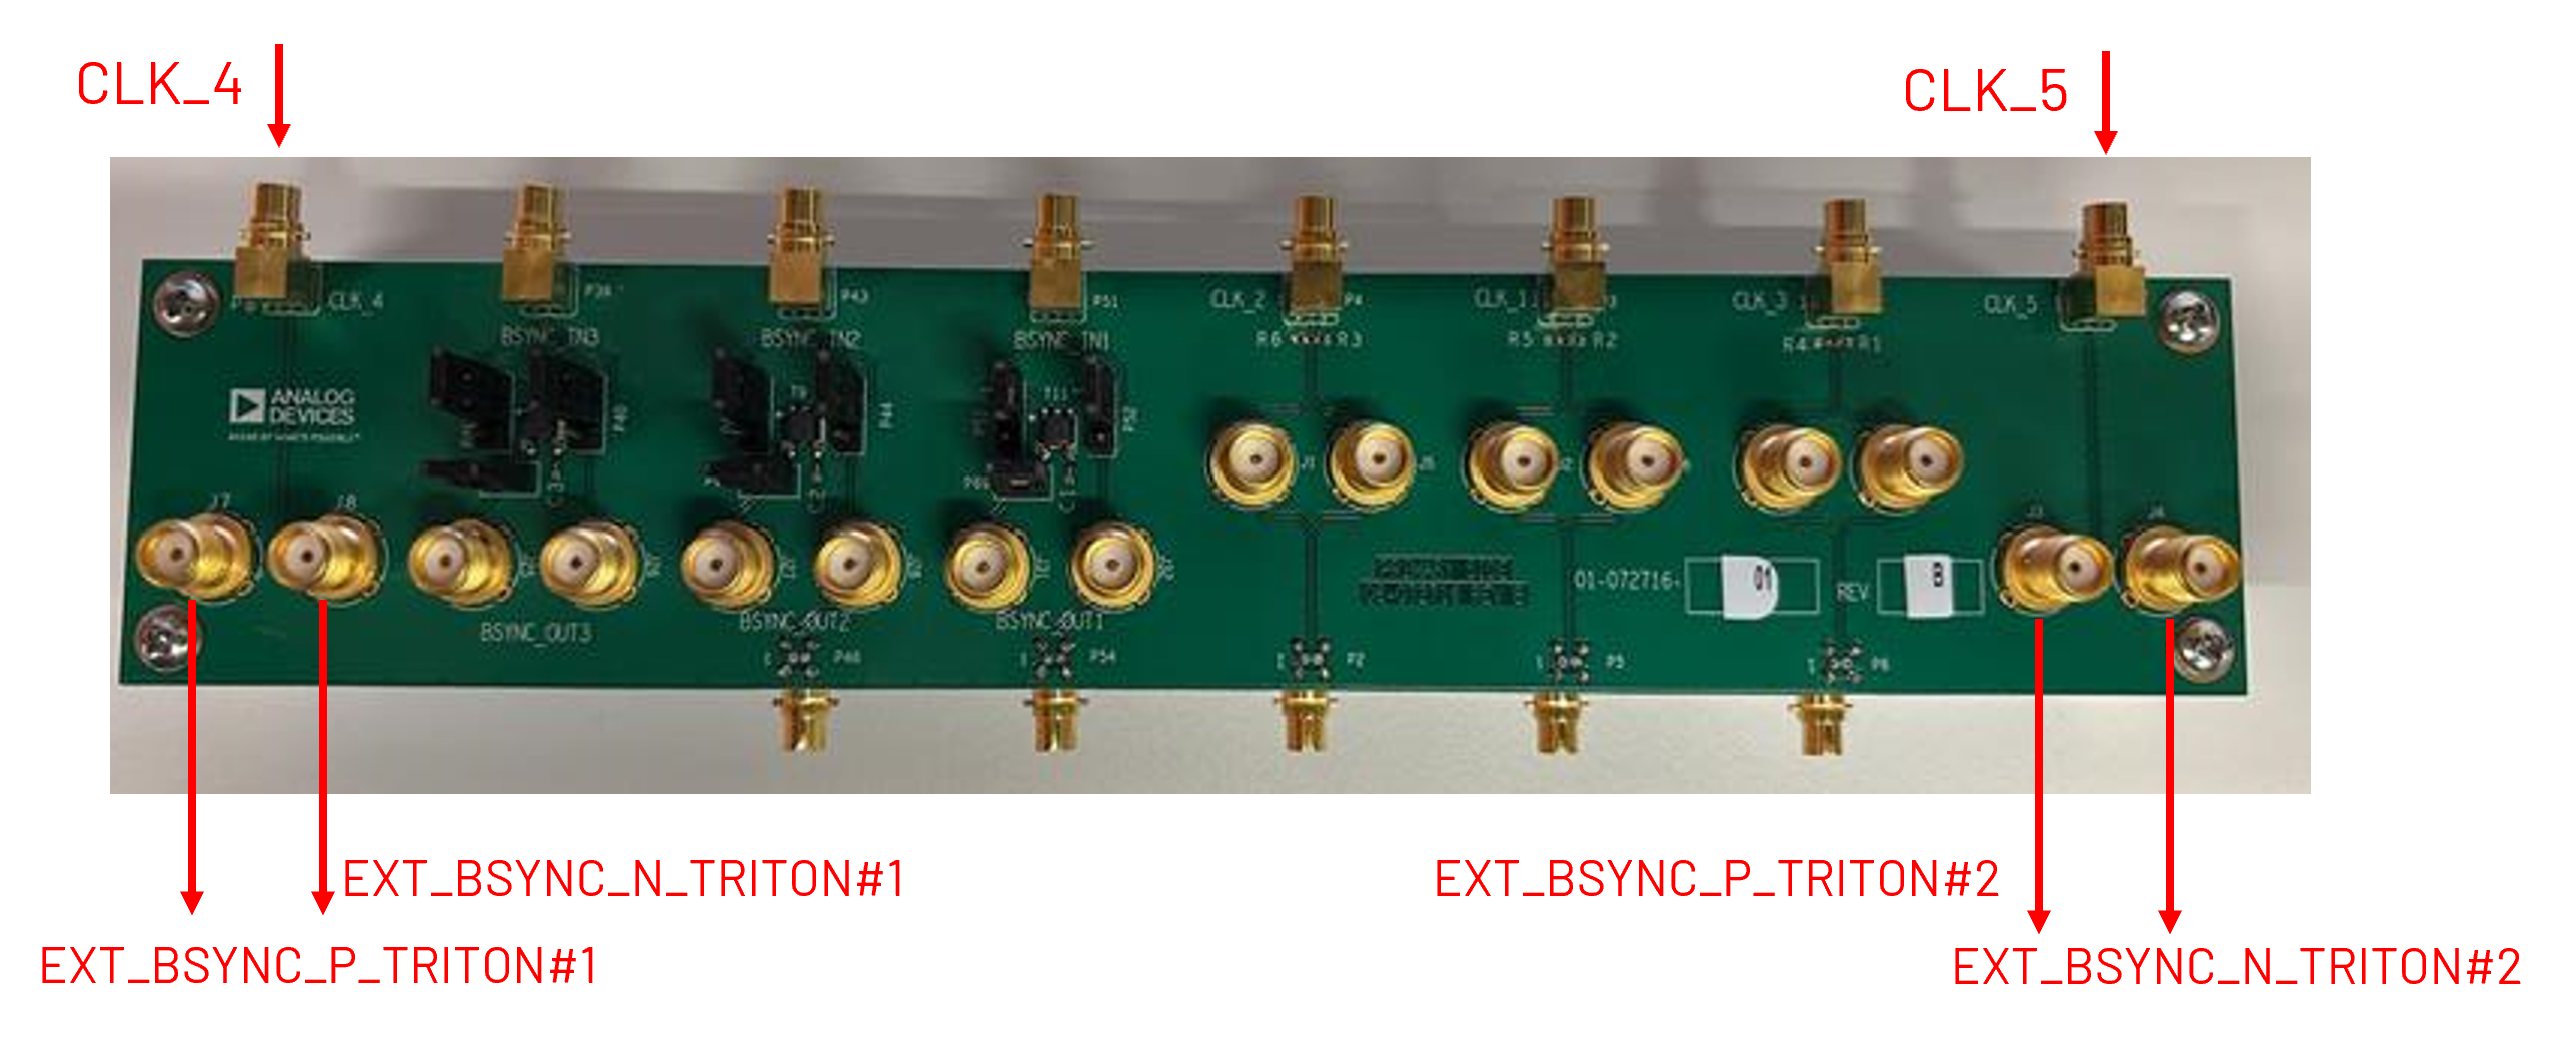
BSYNC_1 will be connected to CLK_4 on the Interposer Board using the supplied Twinax cables with the evaluation kit
BSYNC_3 will be connected to CLK_5 on the Interposer Board using the supplied Twinax cables with the evaluation kit
To ensure the communication to the EVAL-ADF4030 is correct, ensure the dip switches are setup as shown in the image below
Aion Evaluation Board Connections:
Aion Interposer Board Connections:
Aion EVB & Interposer Board Block Diagram:
Software Requirements
At the time of writing, the software associated with this demo is not for general release and is therefore not on the public ADI PyIIO repo.
The software to setup the Aion Eval Board, can be found at the following link ADF4030 Python Eval Source
The following are the steps to install the software correctly:
Create a directory on your control PC (assuming Windows), e.g. C:\ADF4030_Eval_Control
Using your preferred GIT control software, clone the repo from the link above using the following command:
git clone https://github.com/adi-innersource/bfg-py-scripts.git
Using your preferred Python IDE, open the bfg-py-scripts-main folder:
Navigate to \iio_scripts\adf4030\delay in a terminal
Open the following script ahead of execution –> adf4030_delay_test.py
There are a few edits needed ahead of execution:
Line 15: The default Comm Port for the SDP-K1 board is COM8, you need to ensure this aligns with your Control PC by checking the Device Manager
Line 26: The ref_freq should be changed from the default 125e6 to the required 10e6 (10 MHz) which we are supplying from the Signal Generator
Lines 32/33: Both the bsync_freq parameters should be edited from the 100e6 default to the required 12.5e6 for this setup
Line 37: The second channel to be configured should be Channel 3, not the default 2
Line 41: The tdc_measurement variable should be changed from the default 2 to 3, so we are measuring on the required BSYNC_3 channel
Line 47: The channel to align should be changed from default 2 to the required 3
Line 48: The single_ch_alignment variable should be changed from default 2 to the required 3
Line 50: The tdc_measurement should be changed from the default 2 to the required 3
The Python software is now configured to align BSYNC_1 and BSYNC_3 outputs
Ahead of execution, there is a final modification that is needed to the SDP-K1 board, the firmware needs to be updated to support this mode.
The firmware file, can be found in zip format in the bfg-py-scripts\sdp-k1_bin directory
Unzip this file which will present adf4030.bin file
Open a Windows Explorer window on the Control PC and you should see a SDP-K1 D: Drive present
The adf4030.bin file should be dragged to this D: drive and this will update the firmware on the SDP-K1 board
You can monitor the SDP-K1 board and observe a flashing Orange LED during the update process and then the board will reset
Finally, you should press the reset button on the SDP-K1 board before moving to the next step
Python Code Execution
Now that the Python software is modified to align to our hardware configuration and the SDP-K1 firmware is updated, we are in a position to run the script
In Python IDE terminal, run the following command: python -m iio_scripts.adf4030.delay.adf4030_delay_test
This will first measure the delay between BSYNC_1 and BSYNC_3 ports of the ADF4030 Evaluation Board and it will report the delay in fsec, highlighted in red below
The user will then be prompted to press Enter to align these channels
Once aligned, the updated and aligned delta will be printed on the console with a passing delay of less than 1000 fsec, as highlighted in green below
Aion BSYNC_1 and BSYNC_3 Alignment:

The Aion EVB and Interposer Board is now configured as needed and you can move to the Triton Initialization steps