Embedded Linux
Introduction
This workshop is designed to explore the world of embedded Linux, where you’ll learn to develop applications that run on Linux-based embedded systems. We’ll start by understanding what Linux is and why it’s widely used in embedded systems. Through interactive demonstrations and hands-on activities, you’ll gain practical experience working with Linux device drivers, the IIO subsystem, and GPIO interfaces on real hardware. Let’s dive in and start our journey into embedded Linux applications!
Slide Deck and Booklet
Since this tutorial is also designed to be presented as a live, hands-on workshop, a slide deck is provided here:
Download
A complete booklet of the hands-on activity is also provided, as a companion to following the tutorial yourself:
Download
Theory

What is Linux?
Linux is an open-source operating system found everywhere. It was created by Linus Torvalds and is symbolized by the penguin mascot “Tux”.
Why use Linux:
Free
Open source
No safety issues (compared to proprietary alternatives)
Linux components include:
Bootloader
Kernel
Init system
Daemons
Graphical server
Desktop environment
Applications
Linux vs Windows
Linux |
Windows |
|---|---|
Security |
Prone to malware |
Open source |
Closed source |
Community developed |
Developed by a company |
Free |
License based |
Lightweight |
Resource intensive |
Why Linux on embedded systems
Linux can be used in reduced size systems
Lightweight storage requirements
Robust
Stable
Large developers’ community
Support for a wide range of software architectures
Ability to run on fewer resources
Vendor independence
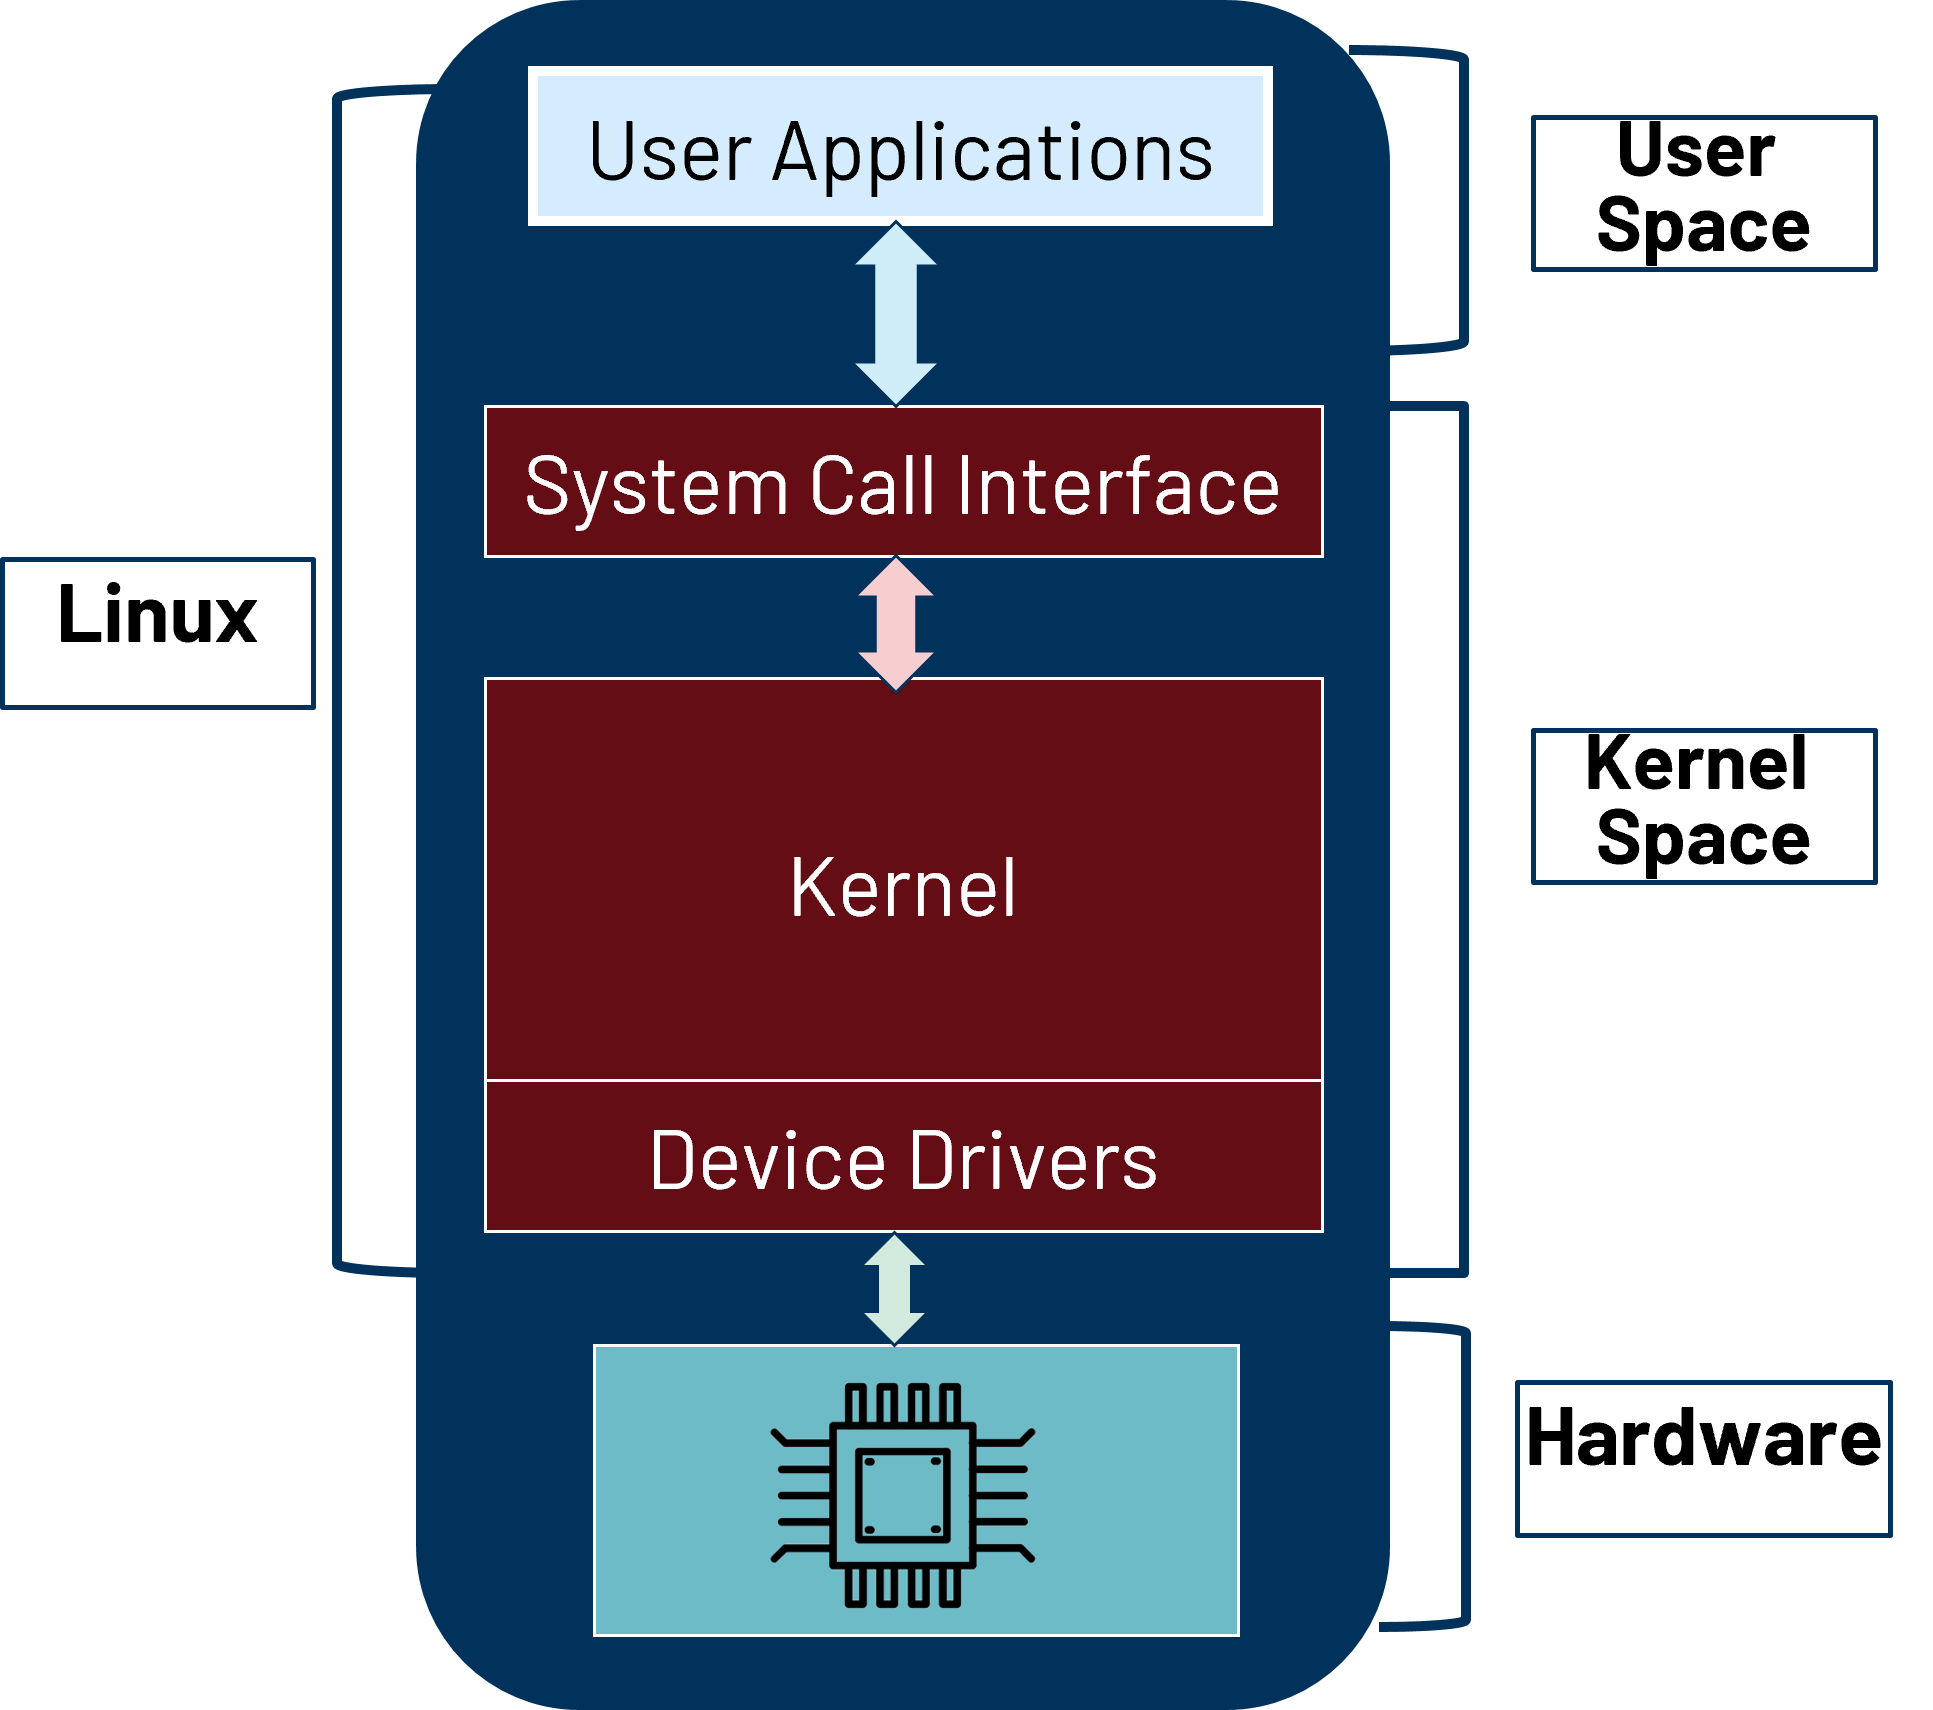
Linux Structure
Linux is organized into two main spaces:
User space - the area of memory that non-kernel applications run in, executed by a user in the operating system, rather than being part of the operating system itself. It contains C libraries and user applications. User space processes run in the user space part of the memory. The user mode is the non-privileged execution mode that the instructions are executed with.
Kernel space - the area of system memory reserved for the kernel. It is distro agnostic (various distros are built on the same kernel). The kernel is loaded when the OS is loaded and remains in memory until the OS is shut down. It contains the System Call Interface, the Linux Kernel, and the device drivers. Linux drivers need to be included in the kernel so the hardware becomes accessible in user space.
Linux Distributions
While the kernel space remains consistent across Linux systems, the user space varies significantly between distributions. Linux distributions are built on top of the Linux kernel, providing different user space environments with varying package managers, init systems, and default applications.
Common distribution families include:
Debian based: Ubuntu, Raspberry Pi OS, Kuiper
Arch based: Manjaro
RPM based: Fedora, CentOS
Regardless of the distribution, they all share the same hierarchical filesystem
structure. The root filesystem is at the top of the file tree (also known as
‘/’). It has a number of directories containing files critical for booting the
system and system operations, including: /etc, /bin, /usr,
/tmp, /dev.
The following sections describe how hardware is made accessible to the Linux kernel. The device tree provides a hardware description, while device drivers implement the software interface to interact with that hardware.
Device Tree
The device tree describes the hardware configuration that the kernel needs to understand.
Unlike PCI or USB devices that can self-identify, embedded peripherals such as GPIOs, I2C sensors, and SPI devices cannot be automatically discovered by the operating system. The Devicetree (DT) provides this explicit hardware description.
Structurally, the DT is a hierarchical tree with the root node (/) at the
top. Each node represents a device or logical grouping and contains:
Properties: Key-value pairs describing the node (e.g.,
compatible,reg,interrupts)Child nodes: Representing sub-devices or components
Linux uses device tree data for platform identification, runtime configuration,
and device population. The kernel matches nodes to drivers using the
compatible property—this is how the system knows which driver to load for
each piece of hardware.
Linux Device Drivers
A Linux device driver is code that knows how to handle a particular device. It provides the right interfaces for the user-space to access that device and abstracts various hardware details from the user-space applications.
Key characteristics:
Implemented in C, in a
.cand.hpairStored under
/drivers/"type"/in the kernel source treeCompiled with the kernel
With hardware described and drivers loaded, user space applications can interact with hardware through well-defined interfaces. The following sections cover GPIO for direct pin control and IIO for sensor and converter devices.
GPIO Interface
GPIO stands for General-Purpose Input/Output and refers to a set of pins on a device (IC). These pins can send or receive electrical signals, but they aren’t designed for any specific purpose. This is why they’re called “general-purpose” IO.
GPIO is one of the most commonly used peripherals in an embedded Linux system. The GPIO access is done using the GPIOLIB framework. Sysfs is a pseudo filesystem provided by the Linux kernel that makes information about various kernel subsystems, hardware devices, and device drivers available in user space through virtual files. GPIO devices appear as part of sysfs.
The basic steps to use a GPIO pin from the sysfs interface:
Export the pin
Set the pin direction (input or output)
If an output pin, set the level to low or high
If an input pin, read the pin’s level (low or high)
When done, unexport the pin
IIO Concepts
The Linux kernel Industrial I/O (IIO) subsystem is intended to provide support for devices that, in some sense, are analog-to-digital or digital-to-analog converters.
Devices that fall into this category are:
ADCs
DACs
Accelerometers, gyros, IMUs
Capacitance-to-Digital converters (CDCs)
Pressure, temperature, and light sensors
RF Transceivers (like the AD9361 / AD9364 / AD9371 / ADRV9009)
The IIO framework can be used on ADCs ranging from a 1 MSPS SoC ADC to >5 GSPS ADCs. It has been in the upstream Linux kernel for more than 10 years.
The IIO subsystem provides a cross-platform libiio library with bindings for many programming languages including C, Python, and C++.
ADXL355 Part
The ADXL355 is a Low Noise, Low Drift, Low Power, 3-Axis MEMS Accelerometer.
Features:
Digital SPI and I2C interfaces supported
20-bit ADC
Data interpolation routine for synchronous sampling
Programmable high- and low-pass digital filters
0 g offset vs. temperature (all axes): 0.15 mg/°C maximum
VSUPPLY with internal regulators: 2.25 V to 3.6 V
Hands-on activity
By the end of this workshop, you will learn:
How to interact with the Linux filesystem
How to use a Linux demo running on specific hardware
How to modify written code to perform certain tasks
How to control LEDs via sysfs
How to build and load kernel modules
How to read sensor data through the IIO subsystem
Materials
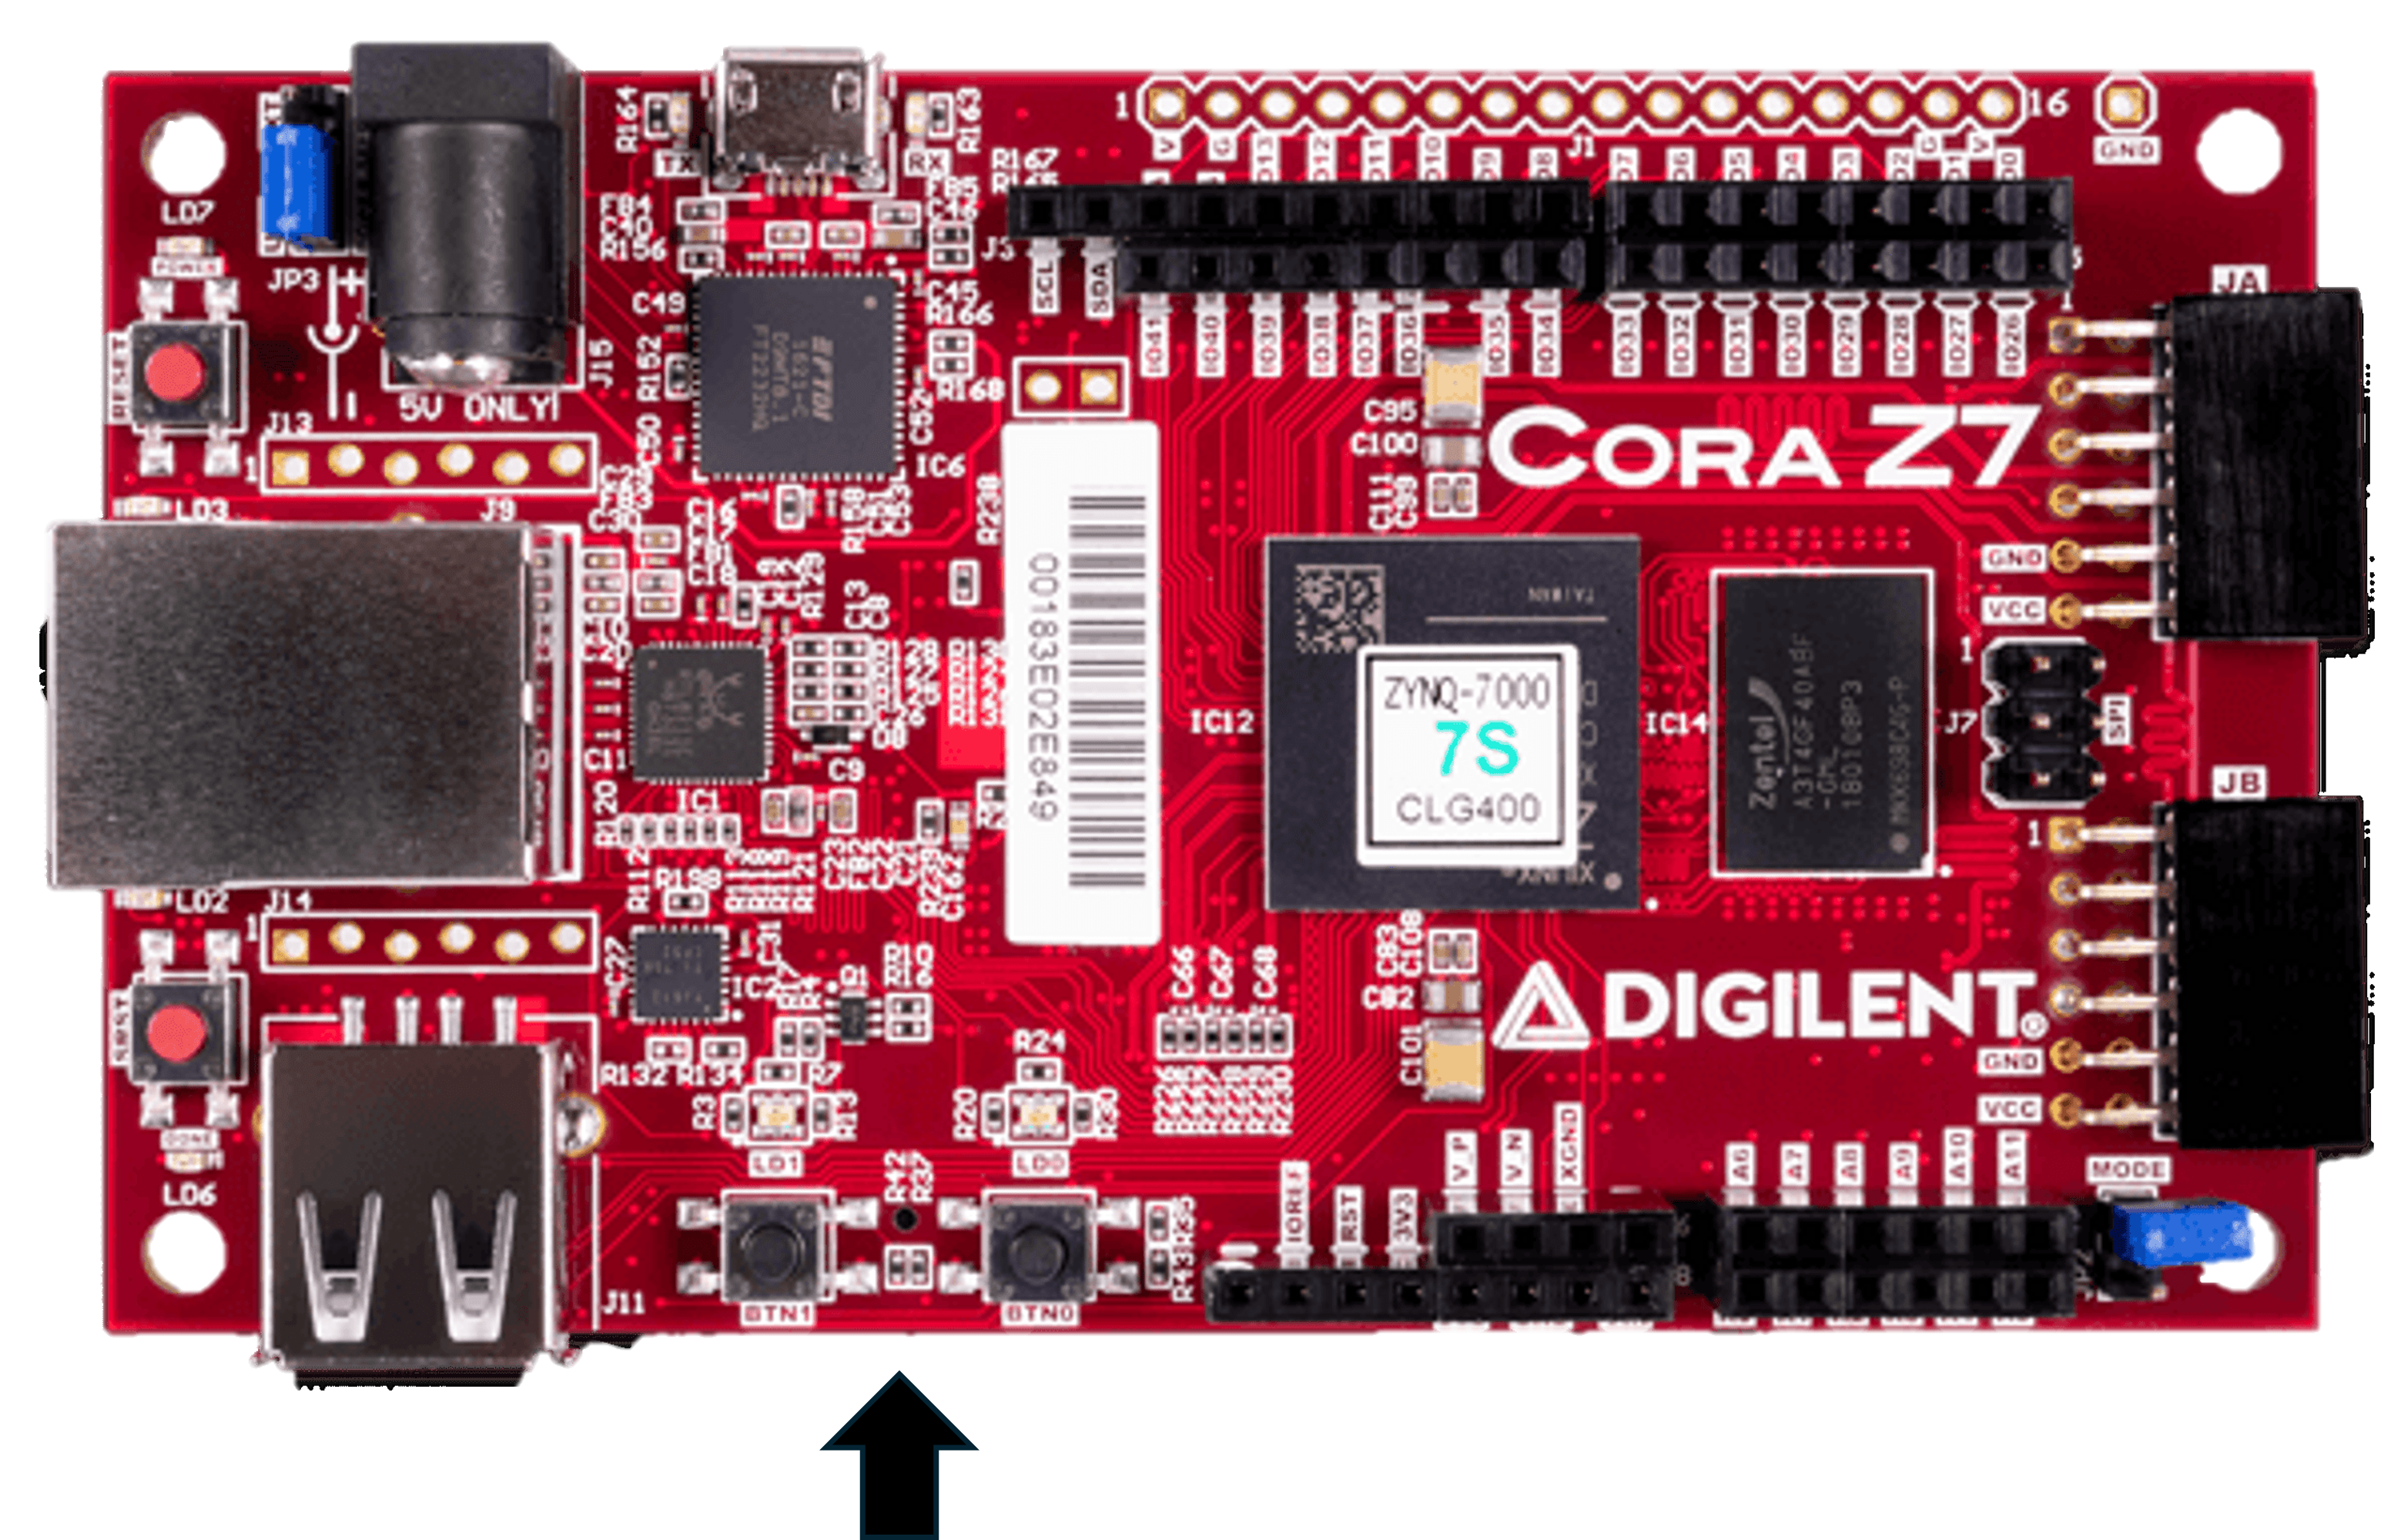
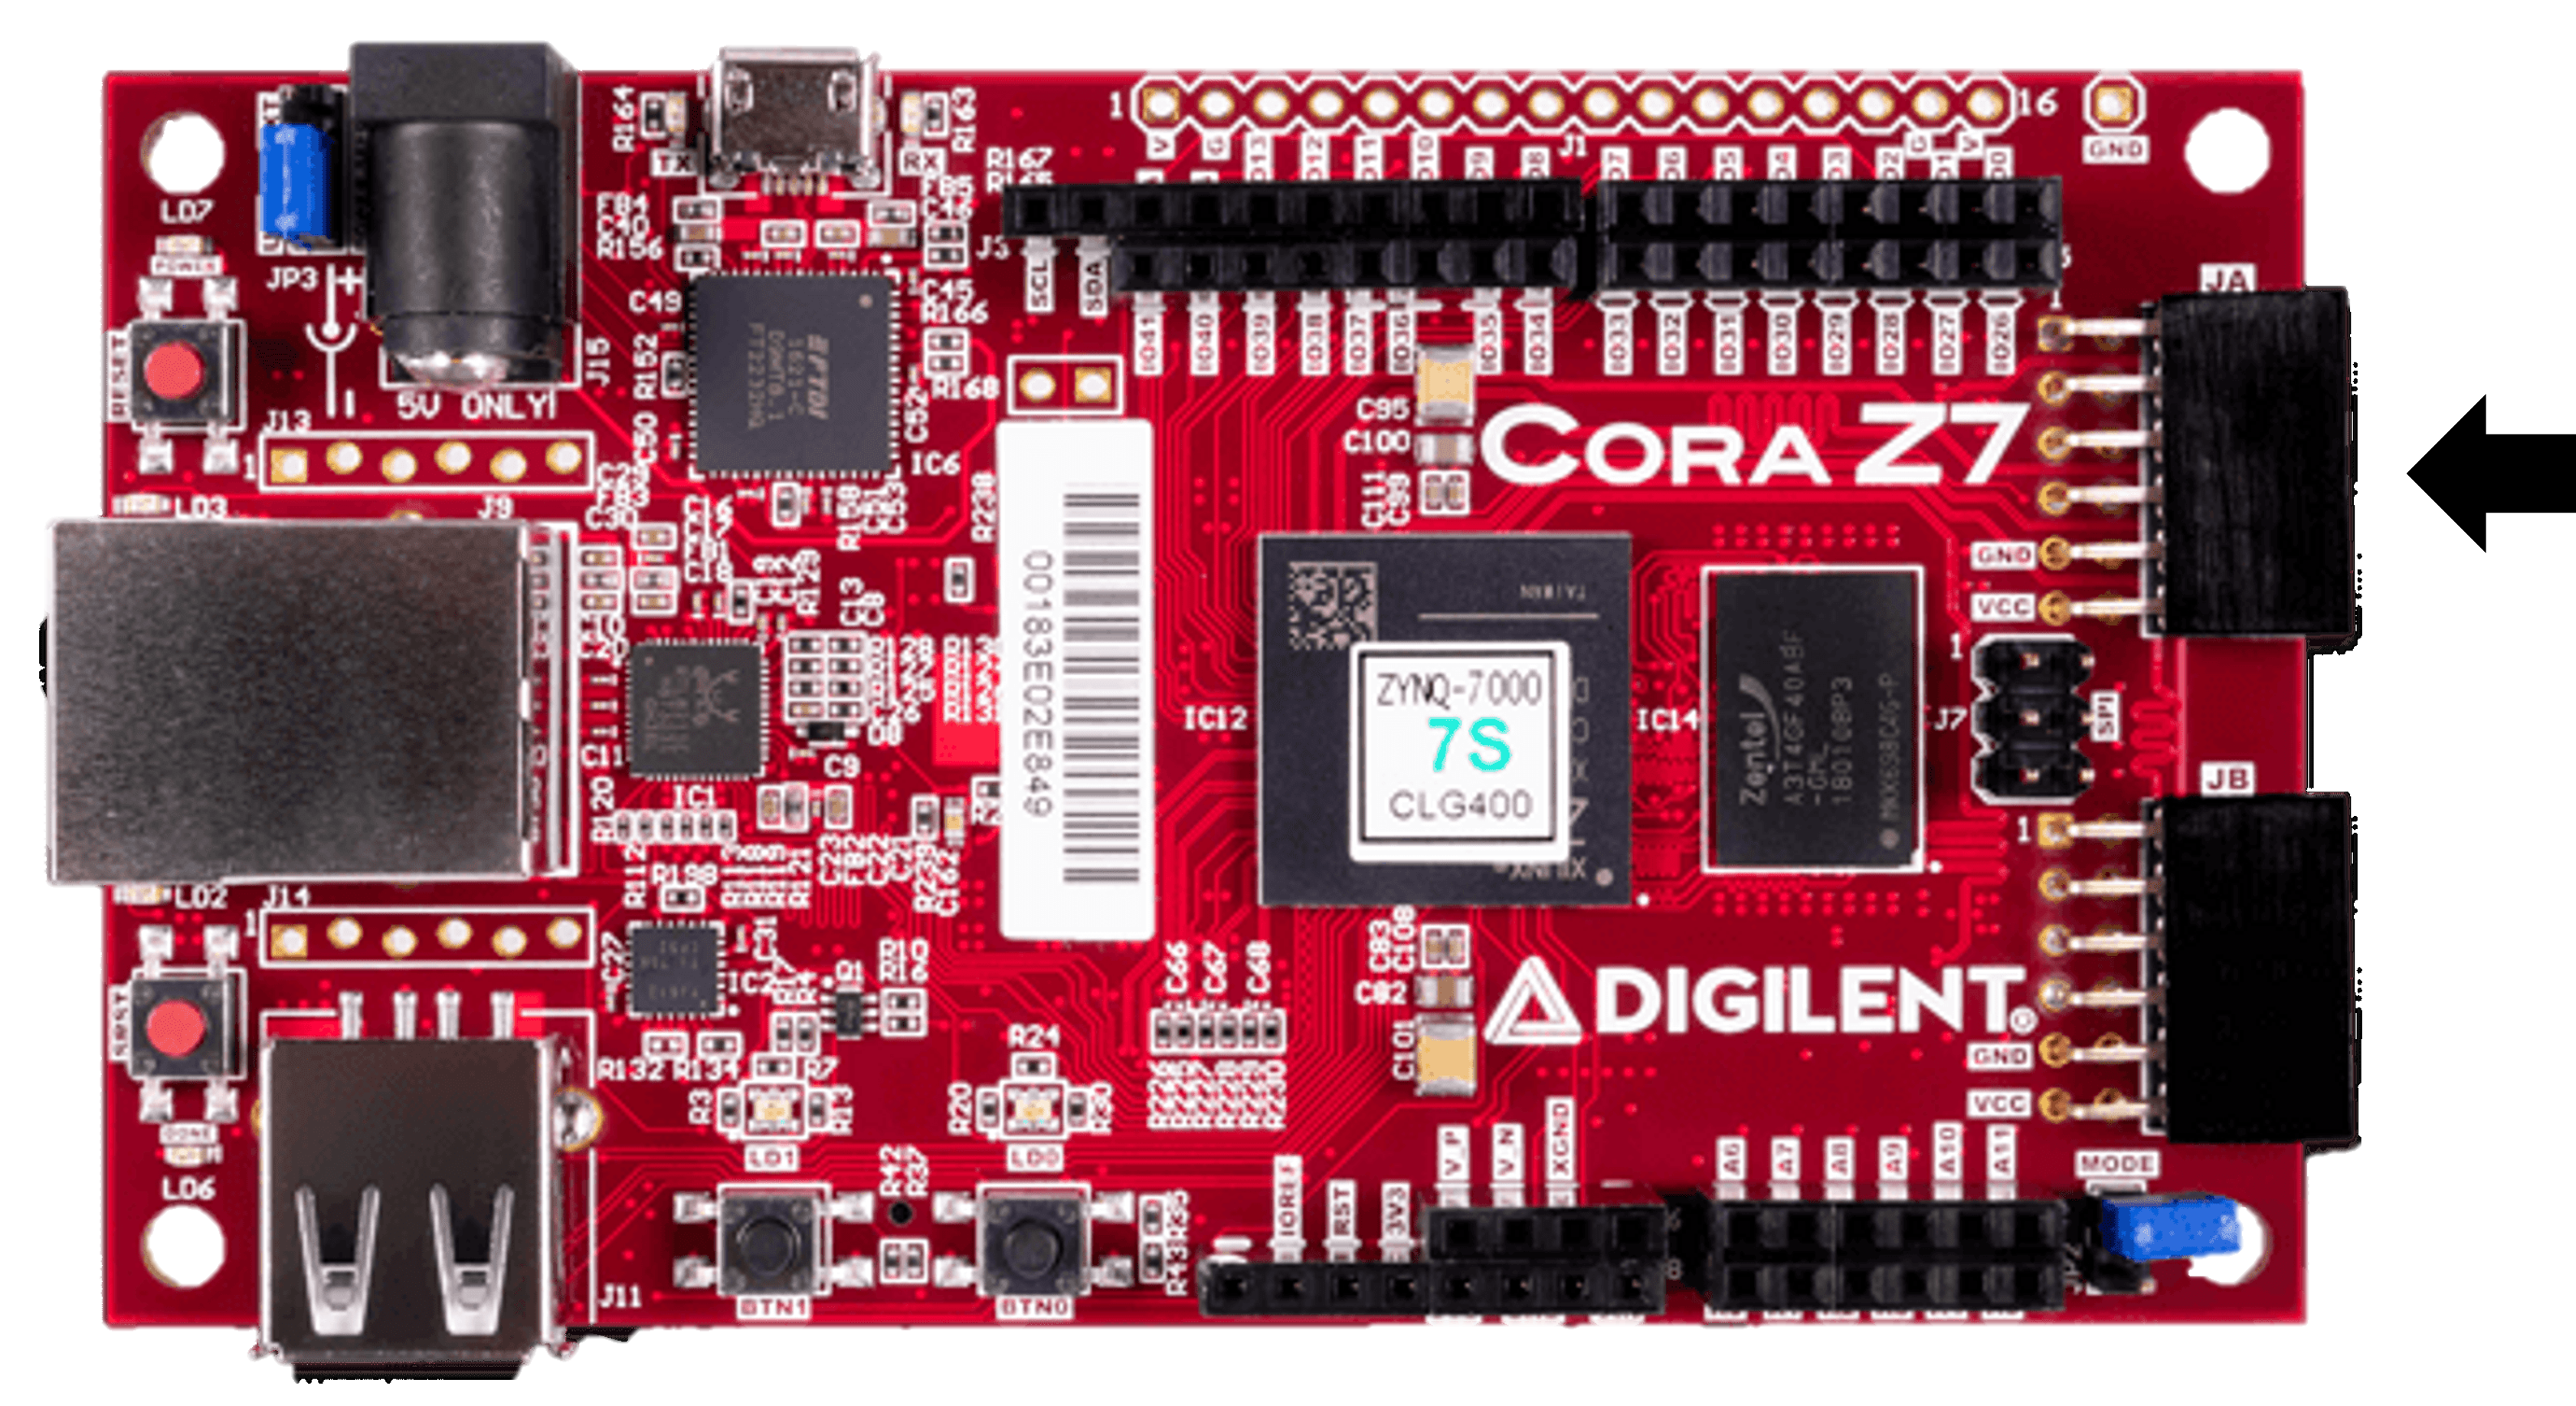
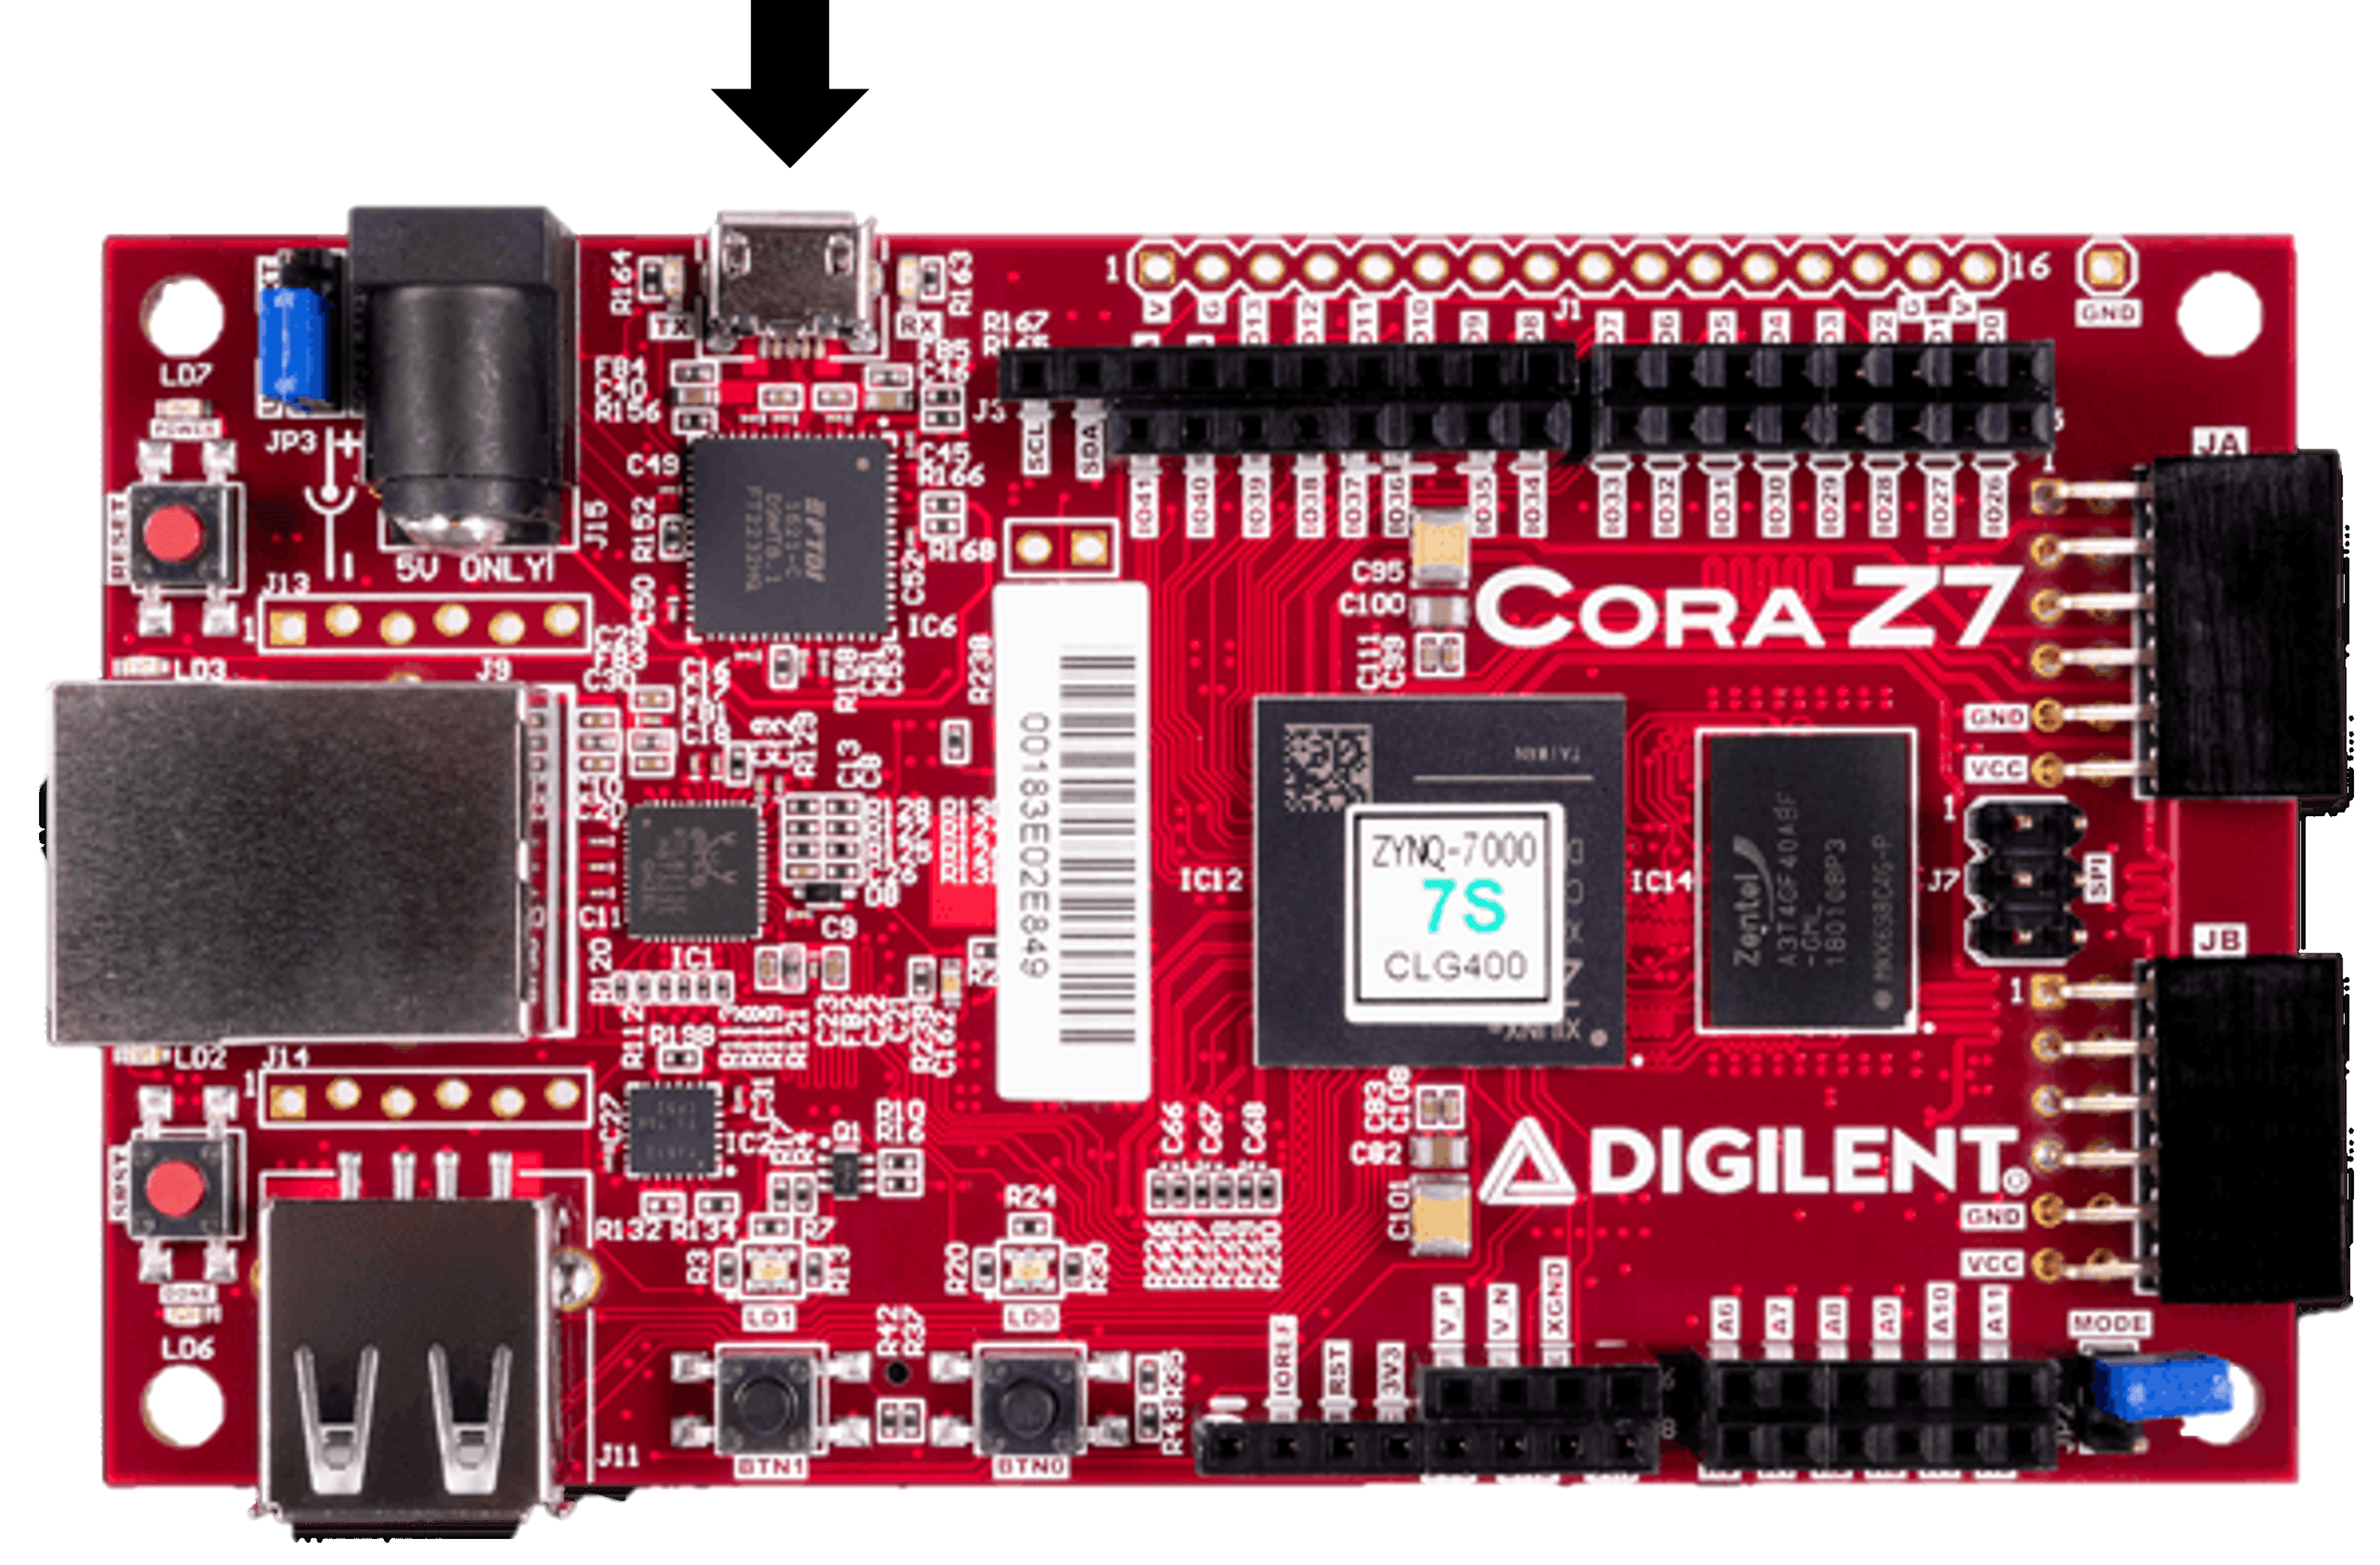
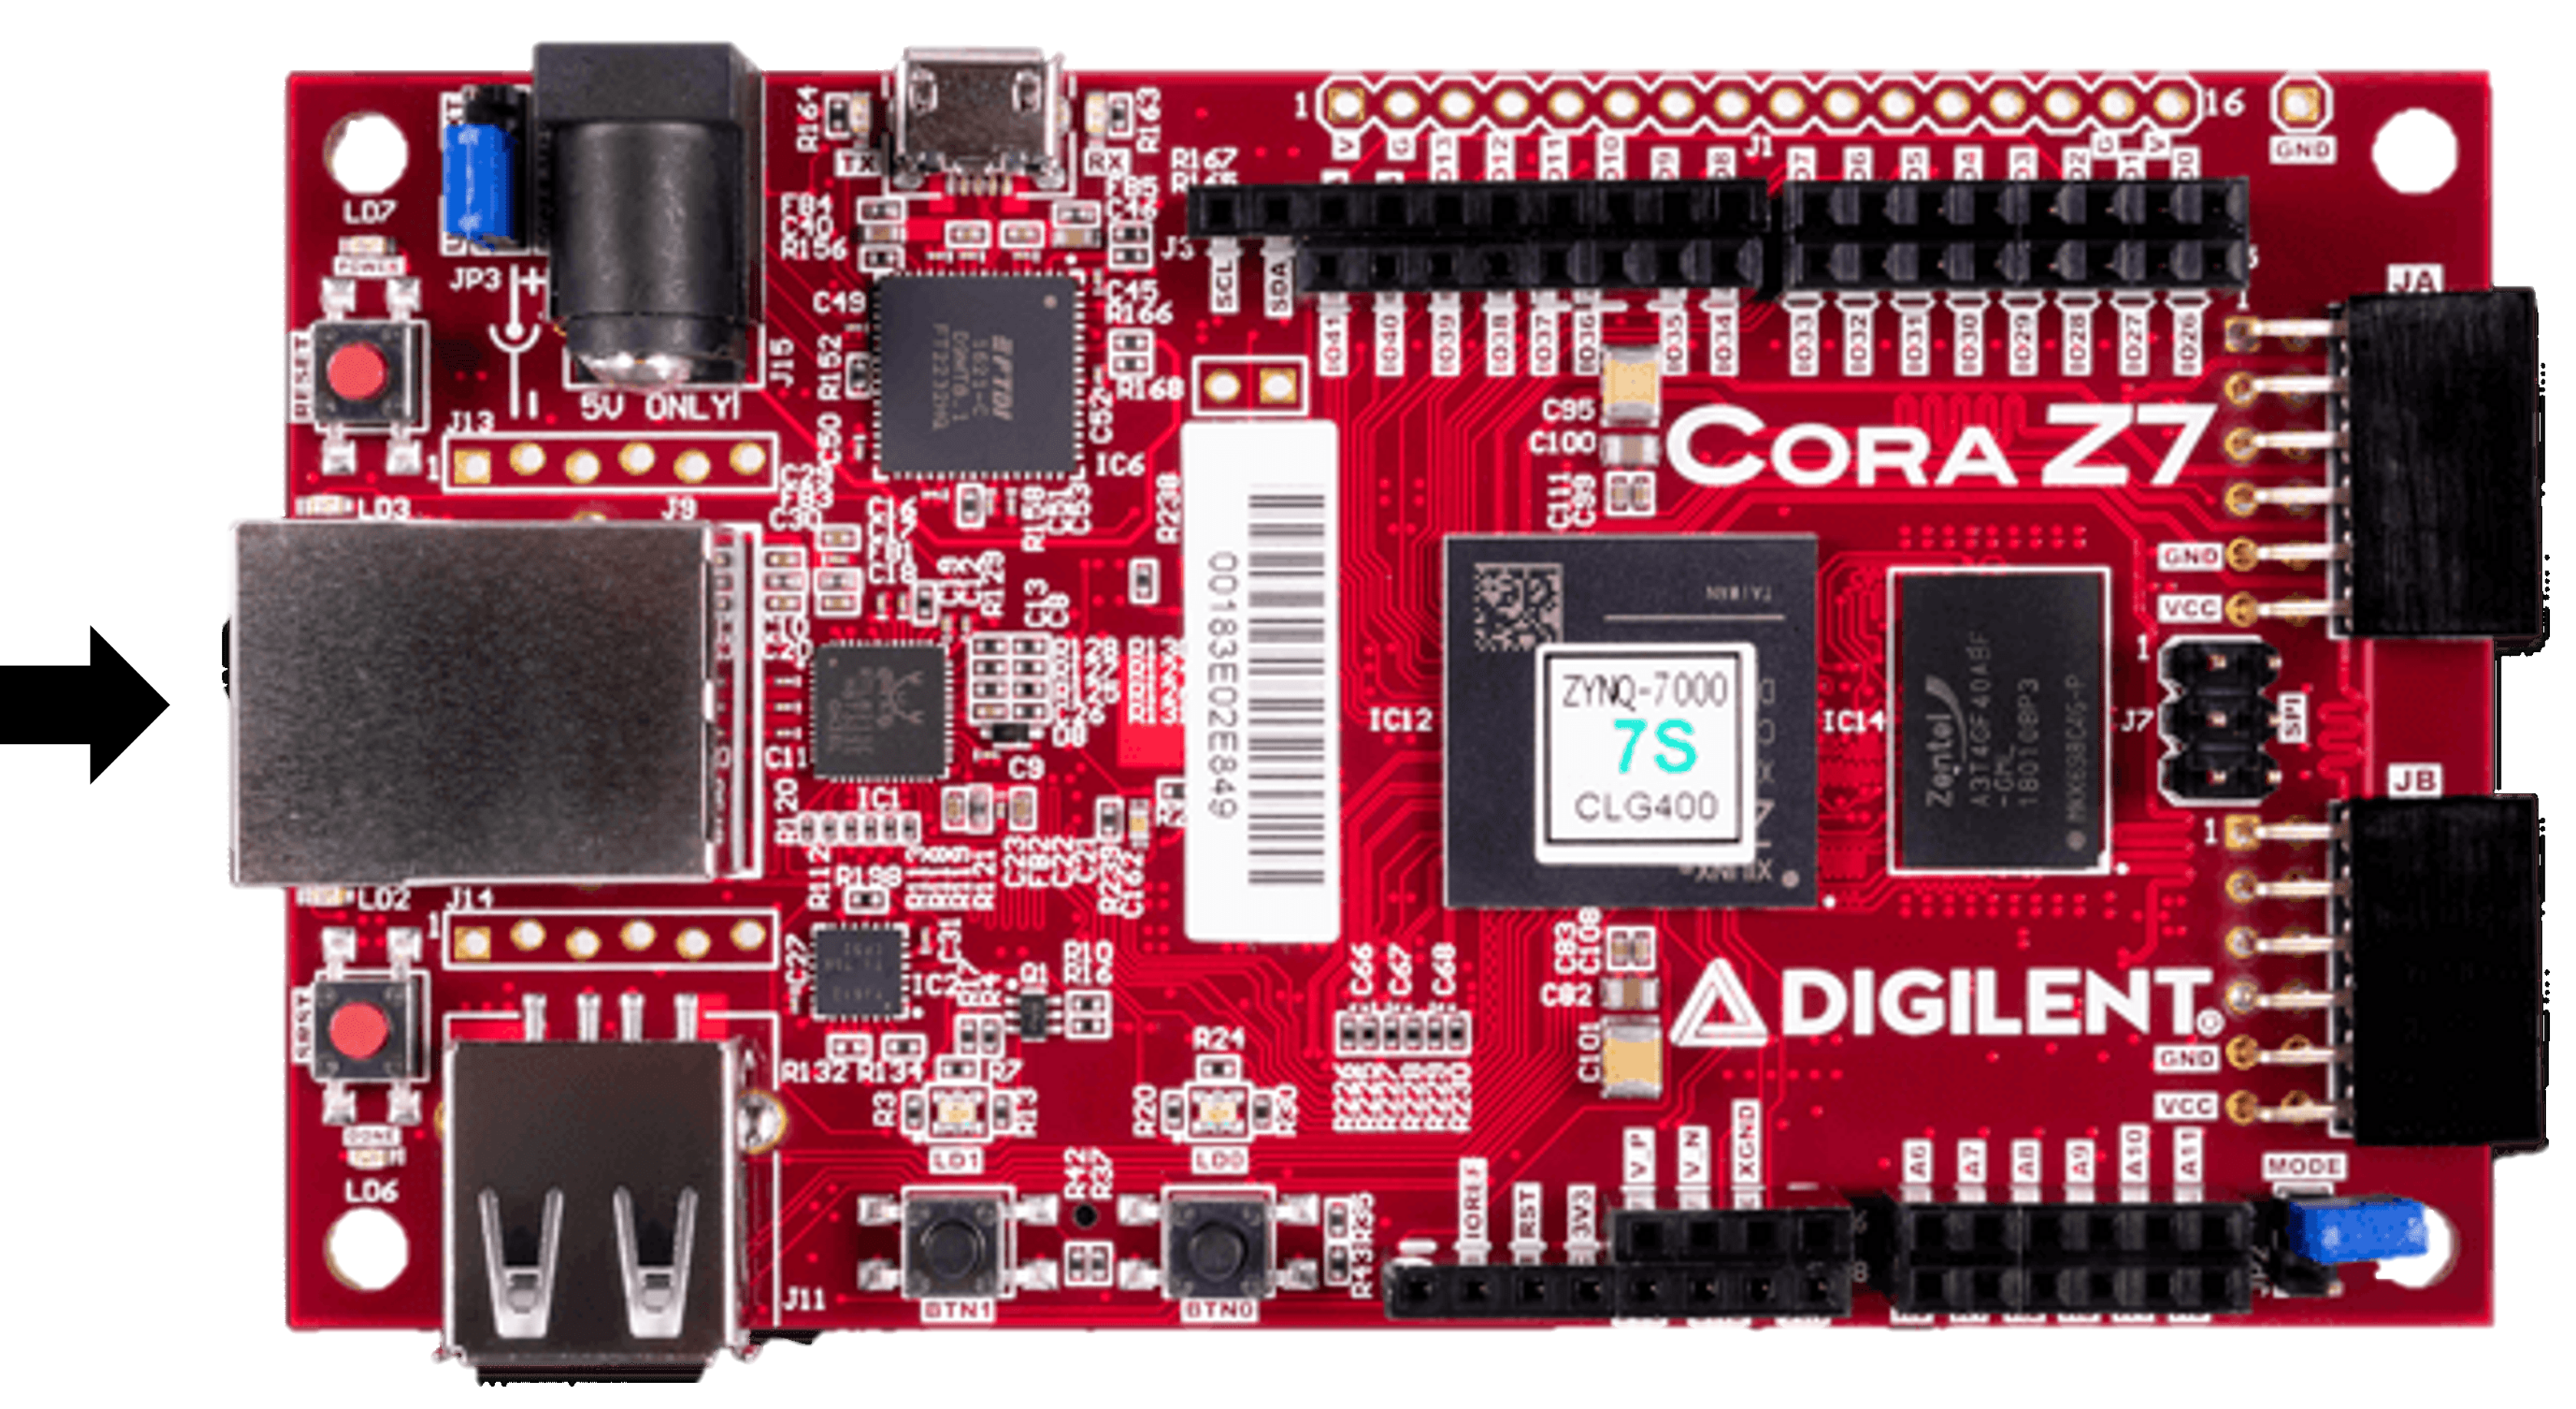
Cora Z7 FPGA Platform (CoraZ7S)
EVAL-ADXL355-PMDZ accelerometer module
Raspberry Pi 5 as development workstation
USB cable for CoraZ7S UART connection
Ethernet cable
2 SD cards
Pre-requisites
Common Linux commands:
cd: used to change the current working directory in Linuxls: lists files and directories within the file systemcat: displays the contents of one or multiple text filesecho: prints out its arguments as standard output; use>or>>with the echo command to print the output to a file instead of displaying it in the terminalmv: moves a file from one location to another, rename a file with or without moving it
Workshop Preparation
This workshop requires two SD cards with pre-configured Kuiper images:
One for the Raspberry Pi 5 (development workstation)
One for the CoraZ7S (target board)
Preparing the Raspberry Pi 5 SD Card
Download the Raspberry Pi 5 workshop image.
Unzip the downloaded file to extract the image.
Write the image to an SD card by following the Writing the Image to an SD Card guide.
Preparing the CoraZ7S SD Card
Download the CoraZ7S workshop image.
Unzip the downloaded file to extract the image.
Write the image to an SD card by following the Writing the Image to an SD Card guide.
Once both SD cards are prepared, proceed to the hardware setup below.
Hardware Setup
Raspberry Pi 5 (Workstation)
Insert the Raspberry Pi 5 SD card and power on the board. Make sure it is connected to the monitor, mouse, and keyboard. The monitor should show the ADI-KUIPER-LINUX desktop.
CoraZ7S (Target Board)
Insert the CoraZ7S SD card in the SD port of CoraZ7S.
Connect the ADXL355 to the JA port of the CoraZ7S board.
Connect the UART port of the CoraZ7S to a USB port of your Raspberry Pi 5 using the USB cable.
Connect the Ethernet port of the CoraZ7S to the Ethernet port of your Raspberry Pi 5.
CoraZ7S Environment Exploration
On your Raspberry Pi 5, search for Terminal and open it.
Write the following command to discover the available IIO devices:
iio_info -s
Look for the IP address corresponding to workshop-cora machine. You will need it for the next steps. To find it easier you can search by the hostname of the carrier:
iio_info -s | grep workshop-cora
The output should look like this:
0: 169.254.35.68 (xadc) [ip:workshop-cora.local]
Write the following command to connect via SSH to the CoraZ7S (replace the IP address in the command with the address of your board):
ssh -X root@169.254.35.68
The password is analog.
At this point you should see this in your terminal:
analog@workshops:~$ ssh root@169.254.35.68
root@169.254.35.68's password:
Linux analog 6.1.70-35308-ge2e62cc28c80 #1525 SMP Fri Aug 15 07:04:44 EEST 2025
armhf

The programs included with the Debian GNU/Linux system are free software;
the exact distribution terms for each program are described in the
individual files in /usr/share/doc/*/copyright.

Debian GNU/Linux comes with ABSOLUTELY NO WARRANTY, to the extent
permitted by applicable law.
Last login: Fri Oct 24 19:11:04 2025 from 169.254.35.68
root@workshop-cora:~#
You are now connected to the CoraZ7S. Every command you run from this point forward will be executed on the CoraZ7S, not your workstation.
Example 1: Turn on a LED and make it blink with a heartbeat rhythm
Move to the LEDs directory using the command below:
cd /sys/class/leds
Here you can see 6 directories corresponding to the 3 colors of each RGB LED on the board:
ls
Each one of them contains the following attributes:
Attribute |
Description |
|---|---|
|
Stores the status of the LED (possible values: 0, 1) |
|
Changes the status of the LED |
|
Indicates the max brightness value that can be written to brightness |
|
A symbolic link pointing to the parent device of the LED |
They may contain other folders and files, depending on the settings.
The important features of the trigger function are:
Trigger |
Description |
|---|---|
|
The default state where no specific trigger is set for the LED |
|
This trigger causes the LED to blink at a specified rate set in
|
|
Turns the LED on for a short period and then turns it off; the period
is set in |
|
Causes the LED to blink in a pattern that mimics a heartbeat |
|
Links the LED activity to CPU activity |
The delay_on and delay_off attributes are active when the timer
features are enabled, and they will appear in the LED folder.
Turn on the RED color of the first LED by setting the corresponding
brightnessto 1:
echo 1 >> led0_red/brightness
Make the red color of the first LED blink in heartbeat mode:
echo heartbeat >> led0_red/trigger
Challenge
Make the first LED light continuously purple and the second LED light green for 1000 ms OFF and for 500 ms ON.
Hint
For the first LED combine two colors to get purple and for the second LED use
the timer trigger and set delay_on and delay_off.
Challenge Solution
For led0 (purple = red + blue):
echo none >> led0_red/trigger
echo 1 >> led0_red/brightness
echo 1 >> led0_blue/brightness
For led1 (green, blinking):
echo 1 >> led1_green/brightness
echo timer >> led1_green/trigger
echo 1000 >> led1_green/delay_off
echo 500 >> led1_green/delay_on
Example 2: Run a script
This example demonstrates how to execute a series of commands within a script, rather than running each command individually in the terminal. You will also learn how any Linux script can be turned into a bash command.
Run the script:
bash /leds.sh
Now make the script available to be run from anywhere in the file system and run it again:
chmod +x /leds.sh
mv /leds.sh /usr/local/bin
leds.sh
Example 3: Build a kernel object for ADXL355 driver
This example demonstrates how to create a kernel object for an existing driver and load it in such a way that the system recognizes it as part of the kernel.
By running the command iio_info in the terminal you will see in the output
that there is no adxl355 device found.
Steps
Move to the adxl355 folder:
cd /adxl355
Create a Makefile:
touch Makefile
Open the Makefile with a file editor of your choice (nano, Vim):
nano Makefile
Write to the Makefile the following lines and then save and exit the file with CTRL+S, then CTRL+X (pay attention to the indentation):
obj-m := adxl355_spi.o

all:
     make -C /usr/src/linux-headers-6.1.0/ M=$(shell pwd) modules

clean:
     make -C /usr/src/linux-headers-6.1.0/ M=$(shell pwd) modules
Note
The indentation before make commands must be a tab character, not
spaces.
Run make to build the kernel object:
make
Load the new kernel object:
insmod adxl355_spi.ko
Check again with
iio_infoto see readings from the accelerometer.
Example 4: Compute the temperature value from sysfs
The task is allowing you to read the content of attribute files and compute the temperature given by the on-board temperature sensor.
The temperature is computed using the following formula:
Steps
Move to the iio:device folder:
cd /sys/bus/iio/devices/iio:device1
Here you can see all the attributes of the adxl355:
ls
Put temperature values in variables:
SCALE=$(cat in_temp_scale)
OFFSET=$(cat in_temp_offset)
RAW=$(cat in_temp_raw)
Compute the temperature and display it in the terminal (keep in mind that it will be in millidegrees Celsius):
echo "($RAW + $OFFSET) * $SCALE" | bc
Example 5: Play a Snake game with the accelerometer
Using the accelerometer module, you will have the chance to play a little oldie but goldie SNAKE game.
Run the game controls in the background:
python3 /game.py &
Start the Snake game:
/usr/games/nsnake
Move the accelerometer board around and observe the output. Be careful not to disconnect the wires.
Have fun!
Takeaways
Linux provides a robust embedded platform: The combination of open-source licensing, lightweight resource requirements, and extensive hardware support makes Linux ideal for embedded systems.
Sysfs enables hardware interaction: The pseudo filesystem allows user-space applications to interact with kernel subsystems, hardware devices, and device drivers through virtual files.
IIO simplifies sensor integration: The Industrial I/O framework provides a standardized way to work with ADCs, DACs, accelerometers, and other sensors in embedded Linux applications.
Kernel modules extend functionality: Building and loading kernel objects allows dynamic addition of device driver support without recompiling the entire kernel.
Scripting automates tasks: Shell scripts enable automation of repetitive tasks and can be made available system-wide as commands.
Resources
Linux
Hardware