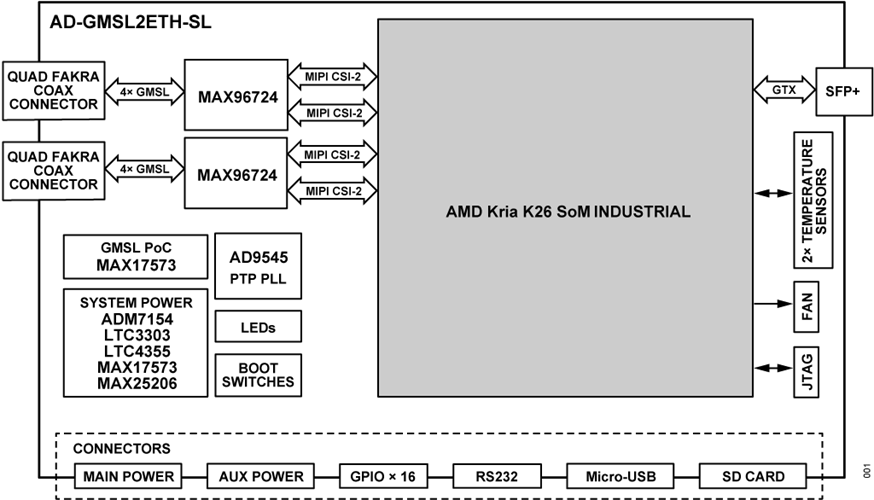
AD-GMSL2ETH-SL
FPGA-based 8x GMSL to 10 Gb Ethernet Adapter
Introduction
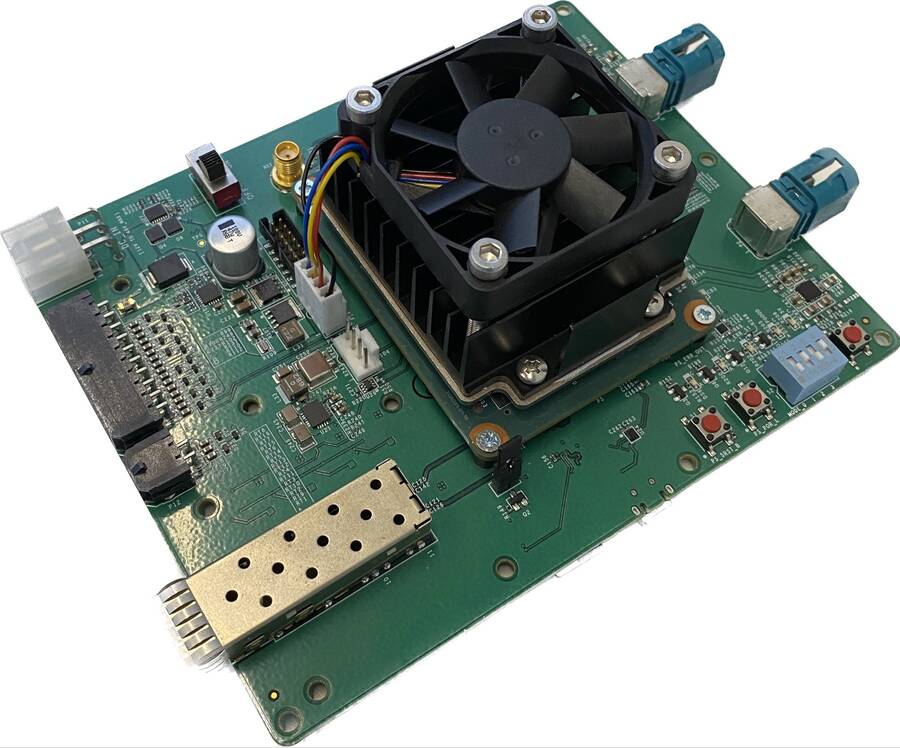
The AD-GMSL2ETH-SL is an edge compute platform enabling low latency data transfer from eight Gigabit Multimedia Serial Link™ (GMSL) interfaces on to a 10 Gb Ethernet link. The target applications include autonomous robots and vehicles where machine vision and real-time sensor fusion is critical. Some of the main features and benefits include:
8 x GMSL2 camera interfaces with up to 6 Gbps/channel
10 Gbps SFP+ Ethernet interface
Precision Time Protocol for synchronization with host systems and other edge devices
Embedded processing capabilities using the on-board AMD Kria K26 System-on-Module
ROS2 compliant
Open-source embedded Linux software and FPGA design
Advanced camera triggering functions and control features
Specifications
Interfaces |
|
|---|---|
SFP+ |
Supports 10 Gb Ethernet with IEEE 1588 hardware timestamping |
RS232 |
Serial interface for connecting UART peripherals, e.g., GNSS devices |
I/O |
16 general purpose I/O pins with software configurable functionality, 3.3 V voltage level |
GMSL |
2 x Quad Fakra connectors supporting 8 x GMSL camera interfaces |
Processing |
|
AMD K26 |
Industrial grade AMD K26 SoM |
Power & Thermal |
|
Power supply |
Input voltage: 9 V to 48 V DC at 24 W max |
Operating temperature |
-40°C to 60°C |
Software |
|
Operating system |
Linux OS |
Network data protocol |
RTP over UDP with software implementation and option for licensable FPGA accelerated RTP & UDP stack |
System Setup & Evaluation
Required Hardware
1 x AD-GMSL2ETH-SL
8 x Fakra cables
2 x Quad-based mini-Fakra cables
1 x 16 GB SD card
1 x PC with 10G ethernet card
1 x SFP+ Ethernet cable
FPGA SD Card Image
Download
After downloading the file, extract the compressed image and write it to the SD card using Balena Etcher or Win32-Disk-Imager.
More details on how to extract a compressed image and write it on the SD card on Linux and Windows can be found here: Writing an image onto the SD card
System Setup
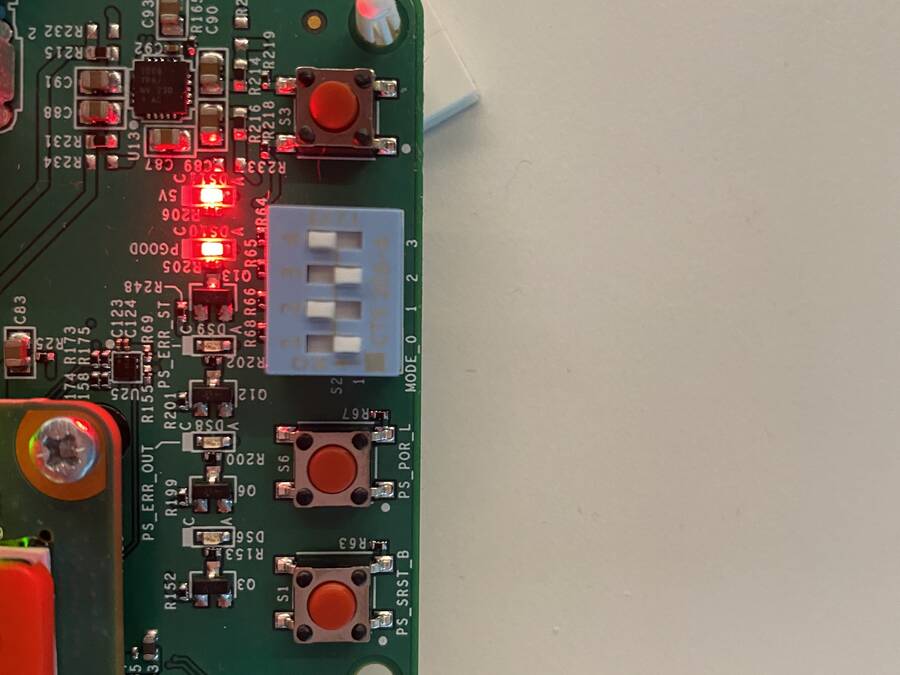
In order to boot using SD card, you will need to set the boot mode’s switches to the corresponding position, as indicated in the following image:
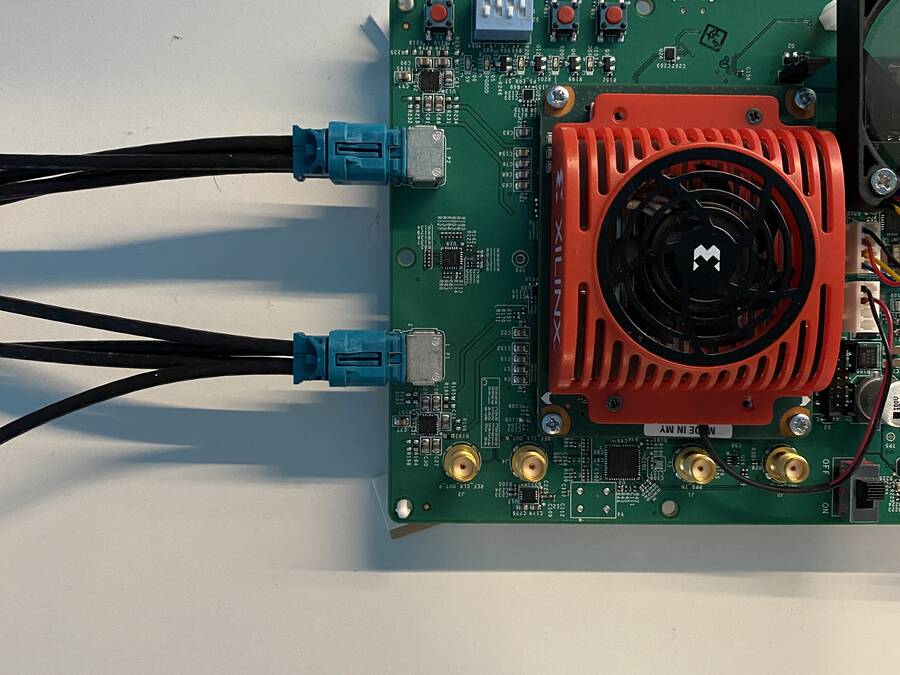
Connect the Quad-based mini-Fakra cables to the corresponding connectors on the board. These will connect the cameras to the corresponding deserializers.
Connect a SFP+ cable to the corresponding SFP port on the board.

Finally, you will need to connect an USB/micro-USB cable to the micro-USB port located on the board. After that, you will be able to connect to the first USB com port that appears on the serial terminal, with a baud rate of 115200.
Note
Ubuntu credentials
user:analog
pass:analog
~$
#eth0 - 10G ethernet interface
~$
ls -l /sys/class/net/
total 0
lrwxrwxrwx 1 root root 0 Mar 20 16:32 eth0 -> ../../devices/platform/axi/a0000000.ethernet/net/eth0
lrwxrwxrwx 1 root root 0 Mar 20 16:32 lo -> ../../devices/virtual/net/lo
lrwxrwxrwx 1 root root 0 Mar 20 16:32 sit0 -> ../../devices/virtual/net/sit0
Important
Both server and client should have the same MTU
~$
#Set the eth0's MTU and IP address
~$
sudo ip link set mtu 9000 dev eth0 up
~$
sudo ifconfig eth0 10.42.0.1
~$
ip a
1: lo: <LOOPBACK,UP,LOWER_UP> mtu 65536 qdisc noqueue state UNKNOWN group default qlen 1000
    link/loopback 00:00:00:00:00:00 brd 00:00:00:00:00:00
    inet 127.0.0.1/8 scope host lo
        valid_lft forever preferred_lft forever
    inet6 ::1/128 scope host
        valid_lft forever preferred_lft forever
2: sit0@NONE: <NOARP> mtu 1480 qdisc noop state DOWN group default qlen 1000
    link/sit 0.0.0.0 brd 0.0.0.0
3: eth0: <BROADCAST,MULTICAST,UP,LOWER_UP> mtu 9000 qdisc mq state UP group default qlen 1000
    link/ether a2:78:c4:14:da:c2 brd ff:ff:ff:ff:ff:ff
    inet 10.42.0.1/8 brd 10.255.255.255 scope global eth0
        valid_lft forever preferred_lft forever
    inet6 fe80::a078::c4ff:fe14:dac2/64 scope link
        valid_lft forever preferred_lft forever
~$
#Configure the video pipeline and the cameras
~$
cd /home/analog/Workspace/K26
/home/analog/Workspace/K26$
./media_cfg_des1/2/12.sh
/home/analog/Workspace/K26$
#(depending on the desired deserializer or 12 for the case when there are two deserializers with 4 cameras)
/home/analog/Workspace/K26$
#Start streaming to another host
/home/analog/Workspace/K26$
cd /home/analog/Workspace/gstreamer
/home/analog/Workspace/gstreamer$
#(depending on the number of cameras - 4 or 8 cameras - 1 or 2 deserializers)
/home/analog/Workspace/gstreamer$
./stream_1des_4cams/2des_8cams.sh [HOST_IP_ADDRESS of the x86-based workstation can be modified/by default is set to 10.42.0.106 in this script]
Note
In order to stop all this processes generated by the streaming-related scripts, you can use the Linux pidof command to see what are the IDs of this gstreamer-related instaces, and after that kill these ones by using Linux kill command, in the following way:
~$
#That is the command to show the ID numbers of the opened processes and will show you 8 numbers - like in the following line
~$
pidof gst-launch-1.0
~$
800 799 798 797 796 795 794 793
~$
sudo kill 800 799 797 796 795 794 793
Now the streams are running on ports 5004 to 5007, depending on the configured number of cameras.
Displaying the Video
On the receiving side, Gstreamer must be installed.
Single Deserializer (4 cameras)
Now open 4 instances of Gstreamer for each port(5004-5007).
On x86 workstation
~$
gst-launch-1.0 udpsrc caps=“application/x-rtp, sampling=YCbCr-4:2:2,
depth=(string)8, width=(string)1920, height=(string )1080” port=“5004” !
rtpvrawdepay ! videoconvert ! fpsdisplaysink video-sink=xvimagesink
text-overlay=true sync=false
~$
gst-launch-1.0 udpsrc caps=“application/x-rtp, sampling=YCbCr-4:2:2,
depth=(string)8, width=(string)1920, height=(string )1080” port=“5005” !
rtpvrawdepay ! videoconvert ! fpsdisplaysink video-sink=xvimagesink
text-overlay=true sync=false
~$
gst-launch-1.0 udpsrc caps=“application/x-rtp, sampling=YCbCr-4:2:2,
depth=(string)8, width=(string)1920, height=(string )1080” port=“5006” !
rtpvrawdepay ! videoconvert ! fpsdisplaysink video-sink=xvimagesink
text-overlay=true sync=false
~$
gst-launch-1.0 udpsrc caps=“application/x-rtp, sampling=YCbCr-4:2:2,
depth=(string)8, width=(string)1920, height=(string )1080” port=“5007” !
rtpvrawdepay ! videoconvert ! fpsdisplaysink video-sink=xvimagesink
text-overlay=true sync=false
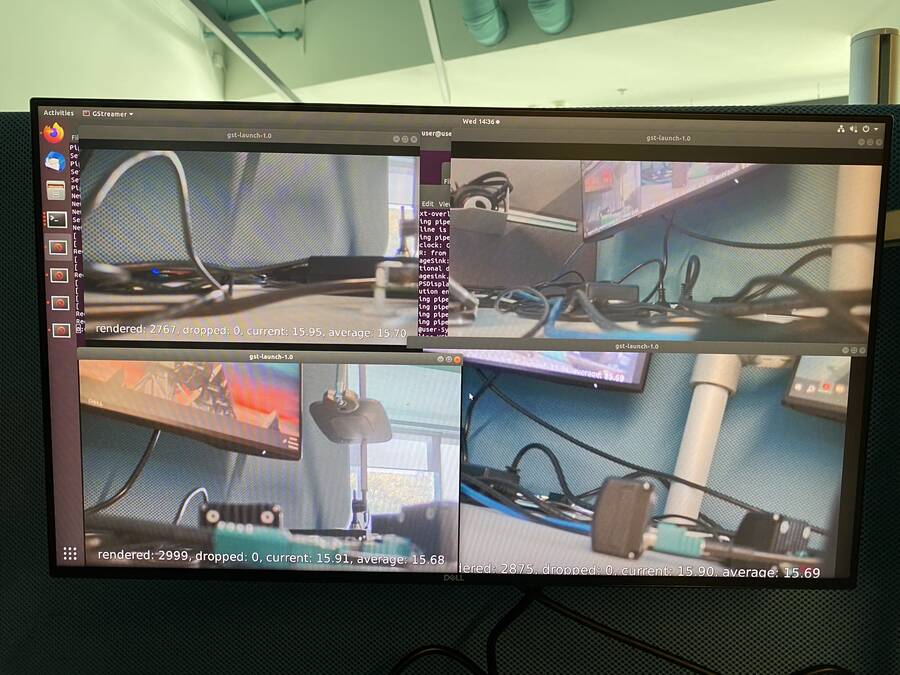
Figure 6 Gstreamer Video Display for Single Deserializer (4 Cameras)
2 x Deserializers (8 cameras)
Now open 8 instances of Gstreamer for each port(5004-5011).
On x86 workstation
~$
gst-launch-1.0 udpsrc caps=“application/x-rtp, sampling=YCbCr-4:2:2,
depth=(string)8, width=(string)1920, height=(string )1080” port=“5004” !
rtpvrawdepay ! videoconvert ! fpsdisplaysink video-sink=xvimagesink
text-overlay=true sync=false
~$
gst-launch-1.0 udpsrc caps=“application/x-rtp, sampling=YCbCr-4:2:2,
depth=(string)8, width=(string)1920, height=(string )1080” port=“5005” !
rtpvrawdepay ! videoconvert ! fpsdisplaysink video-sink=xvimagesink
text-overlay=true sync=false
~$
gst-launch-1.0 udpsrc caps=“application/x-rtp, sampling=YCbCr-4:2:2,
depth=(string)8, width=(string)1920, height=(string )1080” port=“5006” !
rtpvrawdepay ! videoconvert ! fpsdisplaysink video-sink=xvimagesink
text-overlay=true sync=false
~$
gst-launch-1.0 udpsrc caps=“application/x-rtp, sampling=YCbCr-4:2:2,
depth=(string)8, width=(string)1920, height=(string )1080” port=“5007” !
rtpvrawdepay ! videoconvert ! fpsdisplaysink video-sink=xvimagesink
text-overlay=true sync=false
~$
gst-launch-1.0 udpsrc caps=“application/x-rtp, sampling=YCbCr-4:2:2,
depth=(string)8, width=(string)1920, height=(string )1080” port=“5008” !
rtpvrawdepay ! videoconvert ! fpsdisplaysink video-sink=xvimagesink
text-overlay=true sync=false
~$
gst-launch-1.0 udpsrc caps=“application/x-rtp, sampling=YCbCr-4:2:2,
depth=(string)8, width=(string)1920, height=(string )1080” port=“5009” !
rtpvrawdepay ! videoconvert ! fpsdisplaysink video-sink=xvimagesink
text-overlay=true sync=false
~$
gst-launch-1.0 udpsrc caps=“application/x-rtp, sampling=YCbCr-4:2:2,
depth=(string)8, width=(string)1920, height=(string )1080” port=“5010” !
rtpvrawdepay ! videoconvert ! fpsdisplaysink video-sink=xvimagesink
text-overlay=true sync=false
~$
gst-launch-1.0 udpsrc caps=“application/x-rtp, sampling=YCbCr-4:2:2,
depth=(string)8, width=(string)1920, height=(string )1080” port=“5011” !
rtpvrawdepay ! videoconvert ! fpsdisplaysink video-sink=xvimagesink
text-overlay=true sync=false
Help and Support
For questions and more information, please visit the EngineerZone.