EVAL-CN0554-RPIZ
±10 V Analog Input and ±15 V Analog Output for Raspberry Pi Platforms.
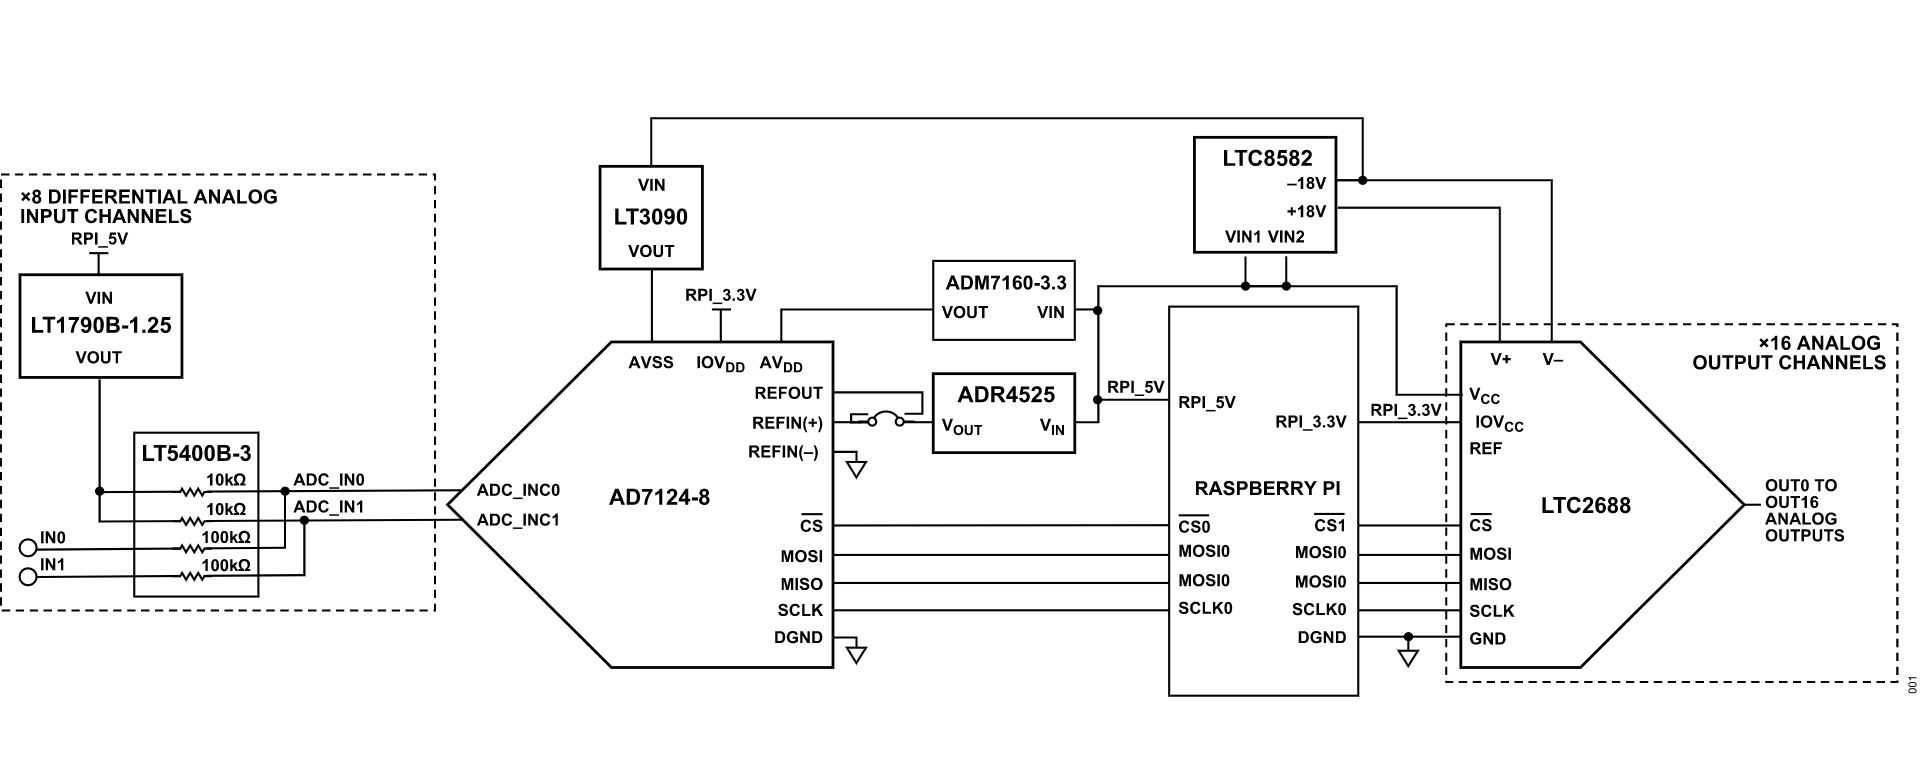
The EVAL-CN0554-RPIZ is a flexible, general-purpose multichannel mixed-signal analog input/output (I/O) module. The 16 single-ended analog outputs are software configurable, with ranges of 0 V to 5 V, ±5 V, 0 V to 10 V, and ±15 V. Eight channels of fully differential analog input are provided with hardware selectable input ranges of ±2.5 V and ±25 V. The circuit is designed to mount directly on top of a Raspberry Pi, providing this popular single board computer an analog input/output interface. Software control is accessible through the Linux industrial input/output (IIO) framework.

Equipment Required
Hardware
EVAL-CN0554-RPIZ Circuit Evaluation Board
Raspberry Pi 4
Monitor with HDMI display
Raspberry Pi 4 Power USB-C Power Supply
HDMI to HDMI cable
Ethernet cable
Female-to-Female Jumper Headers
16 GB or larger SD card with ADI Kuiper Linux image
USB keyboard and mouse
Software
Connectors and Jumper Configurations
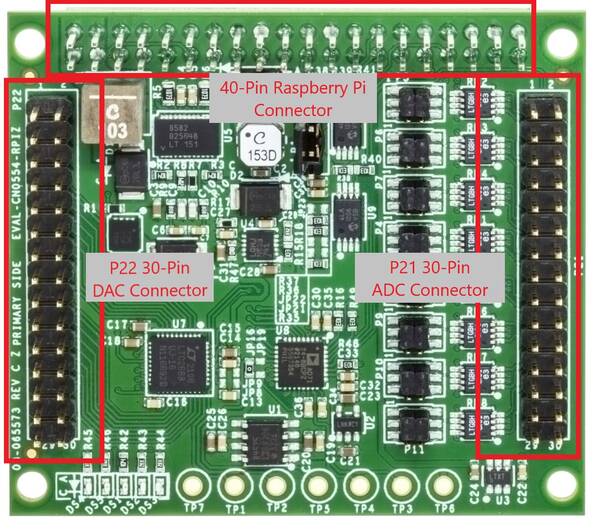
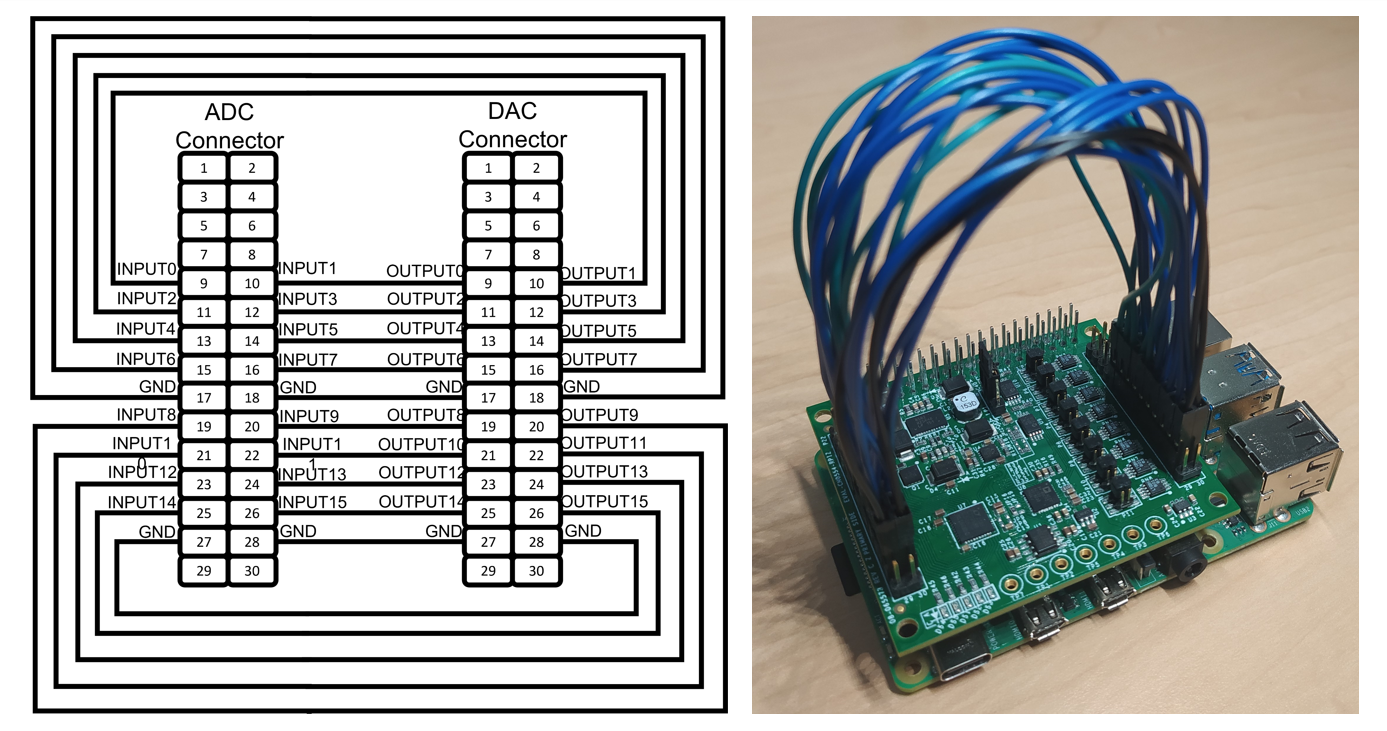
The EVAL-CN0554-RPIZ has three main connectors: the 40-pin connector which mounts the board on top of the Raspberry Pi, the 30-pin DAC connector which has the 16 analog output channels and relevant digital I/O, the 30-pin ADC connector which has the 16 analog input channels and relevant digital I/O.
ADC Header
Need details on the input connector and what to inputs go to what pin on the connector and ADC!
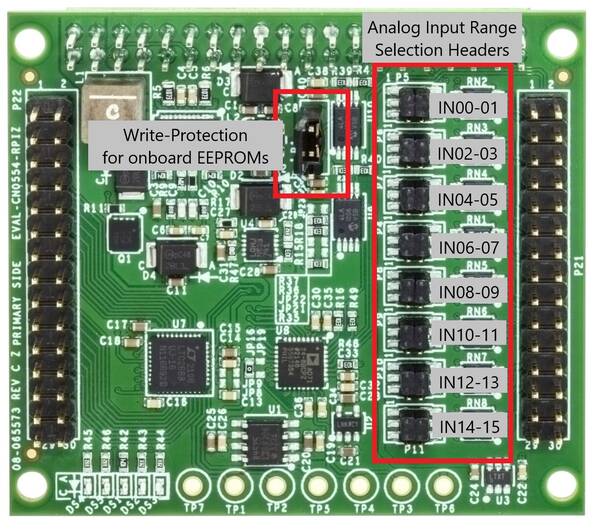
The table below shows the different configurations for each jumper header.
Jumper Configuration |
Input Range |
|---|---|
Shorted Pins 1 and 3, and Pins 2 and 4 |
±13.75 V |
Shorted Pins 3 and 5, and Pins 2 and 6 |
0 V to 27.5 V |
No Connection |
2.5 V |
DAC Header
Need details on the output connector and which connections go where on the DAC channels.
Dither and Toggle
Need details on which pins this is on for the RPI and which outputs they affect
The EVAL-CN0554-RPIZ has nine jumper headers, eight are for selecting the attenuation of the eight pairs of analog inputs and one is for setting the write protection of onboard EEPROMs
System Setup
Equipment Required
Hardware
EVAL-CN0554-RPIZ Circuit Evaluation Board
Raspberry Pi 4 Model B
Display monitor with HDMI
Micro HDMI to HDMI adapter
USB keyboard and mouse
16 GB or larger SD card
5 V, 3 A USB Type-C power adapter
Female-to-female loopback jumper cables
Oscilloscope
Digital voltmeter (6-digit or higher)
Software
Documentation
System Block Diagram
Running the System
To set up the complete system, follow these steps:
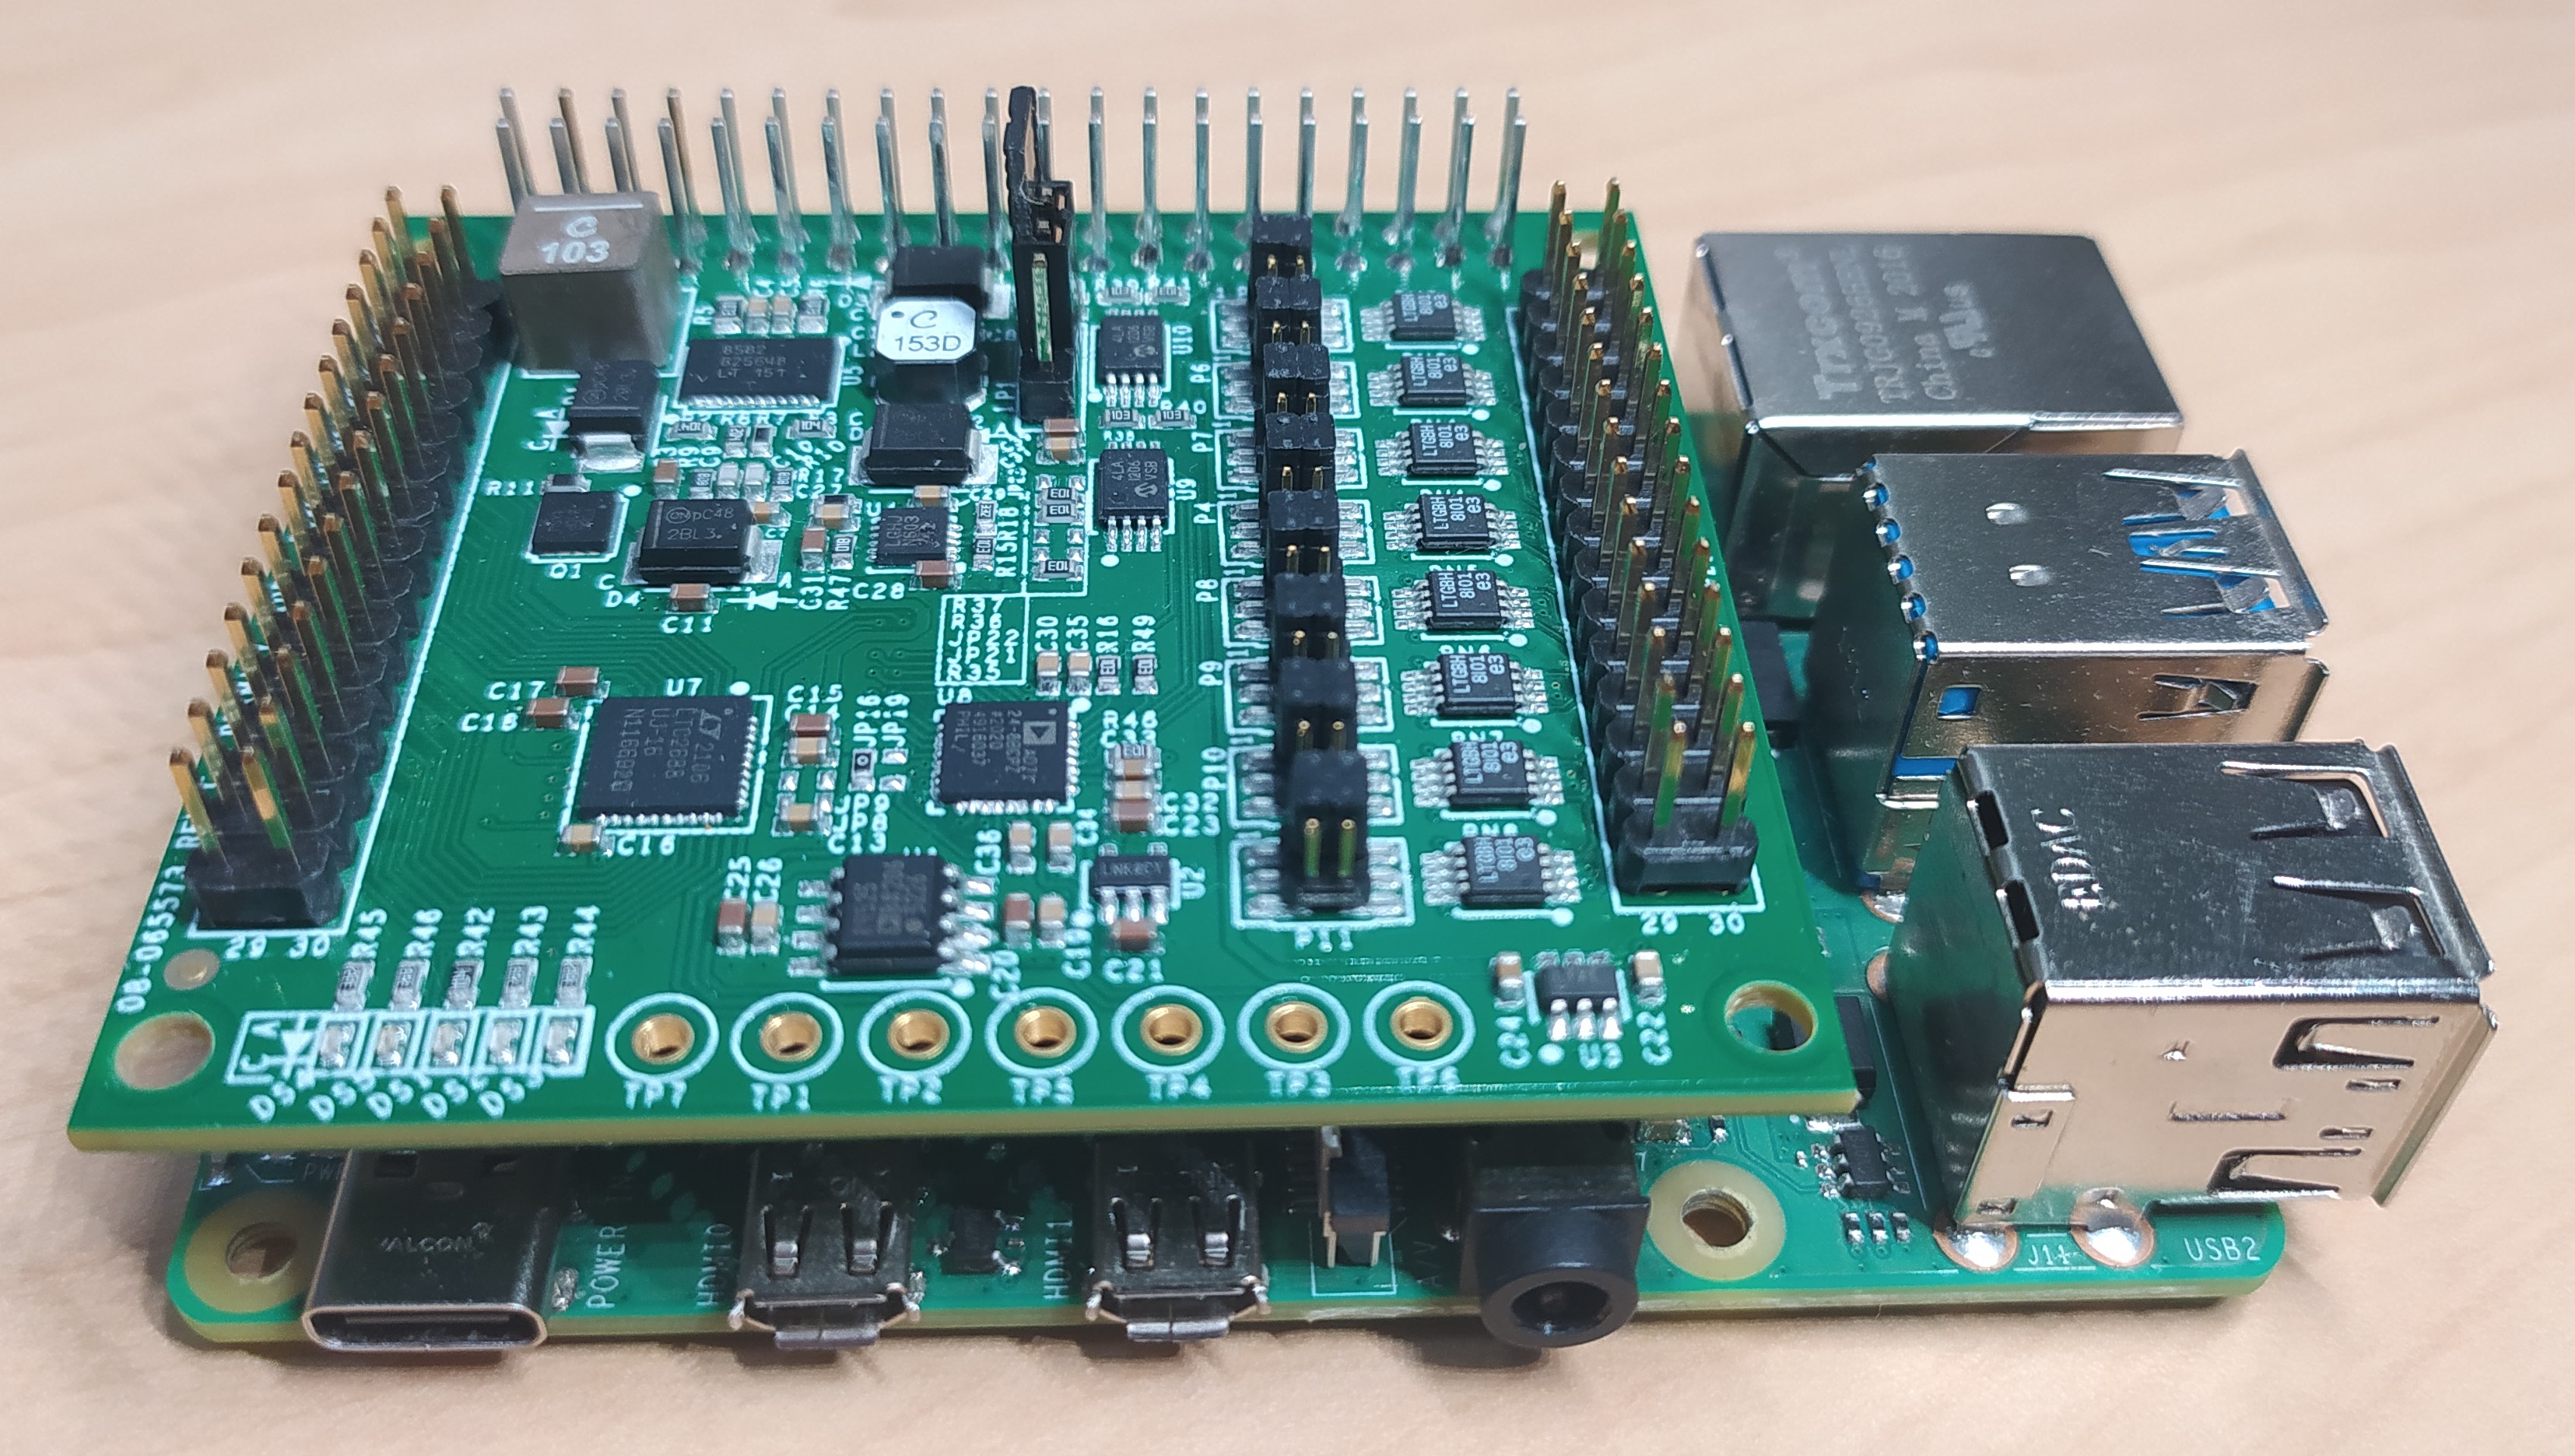
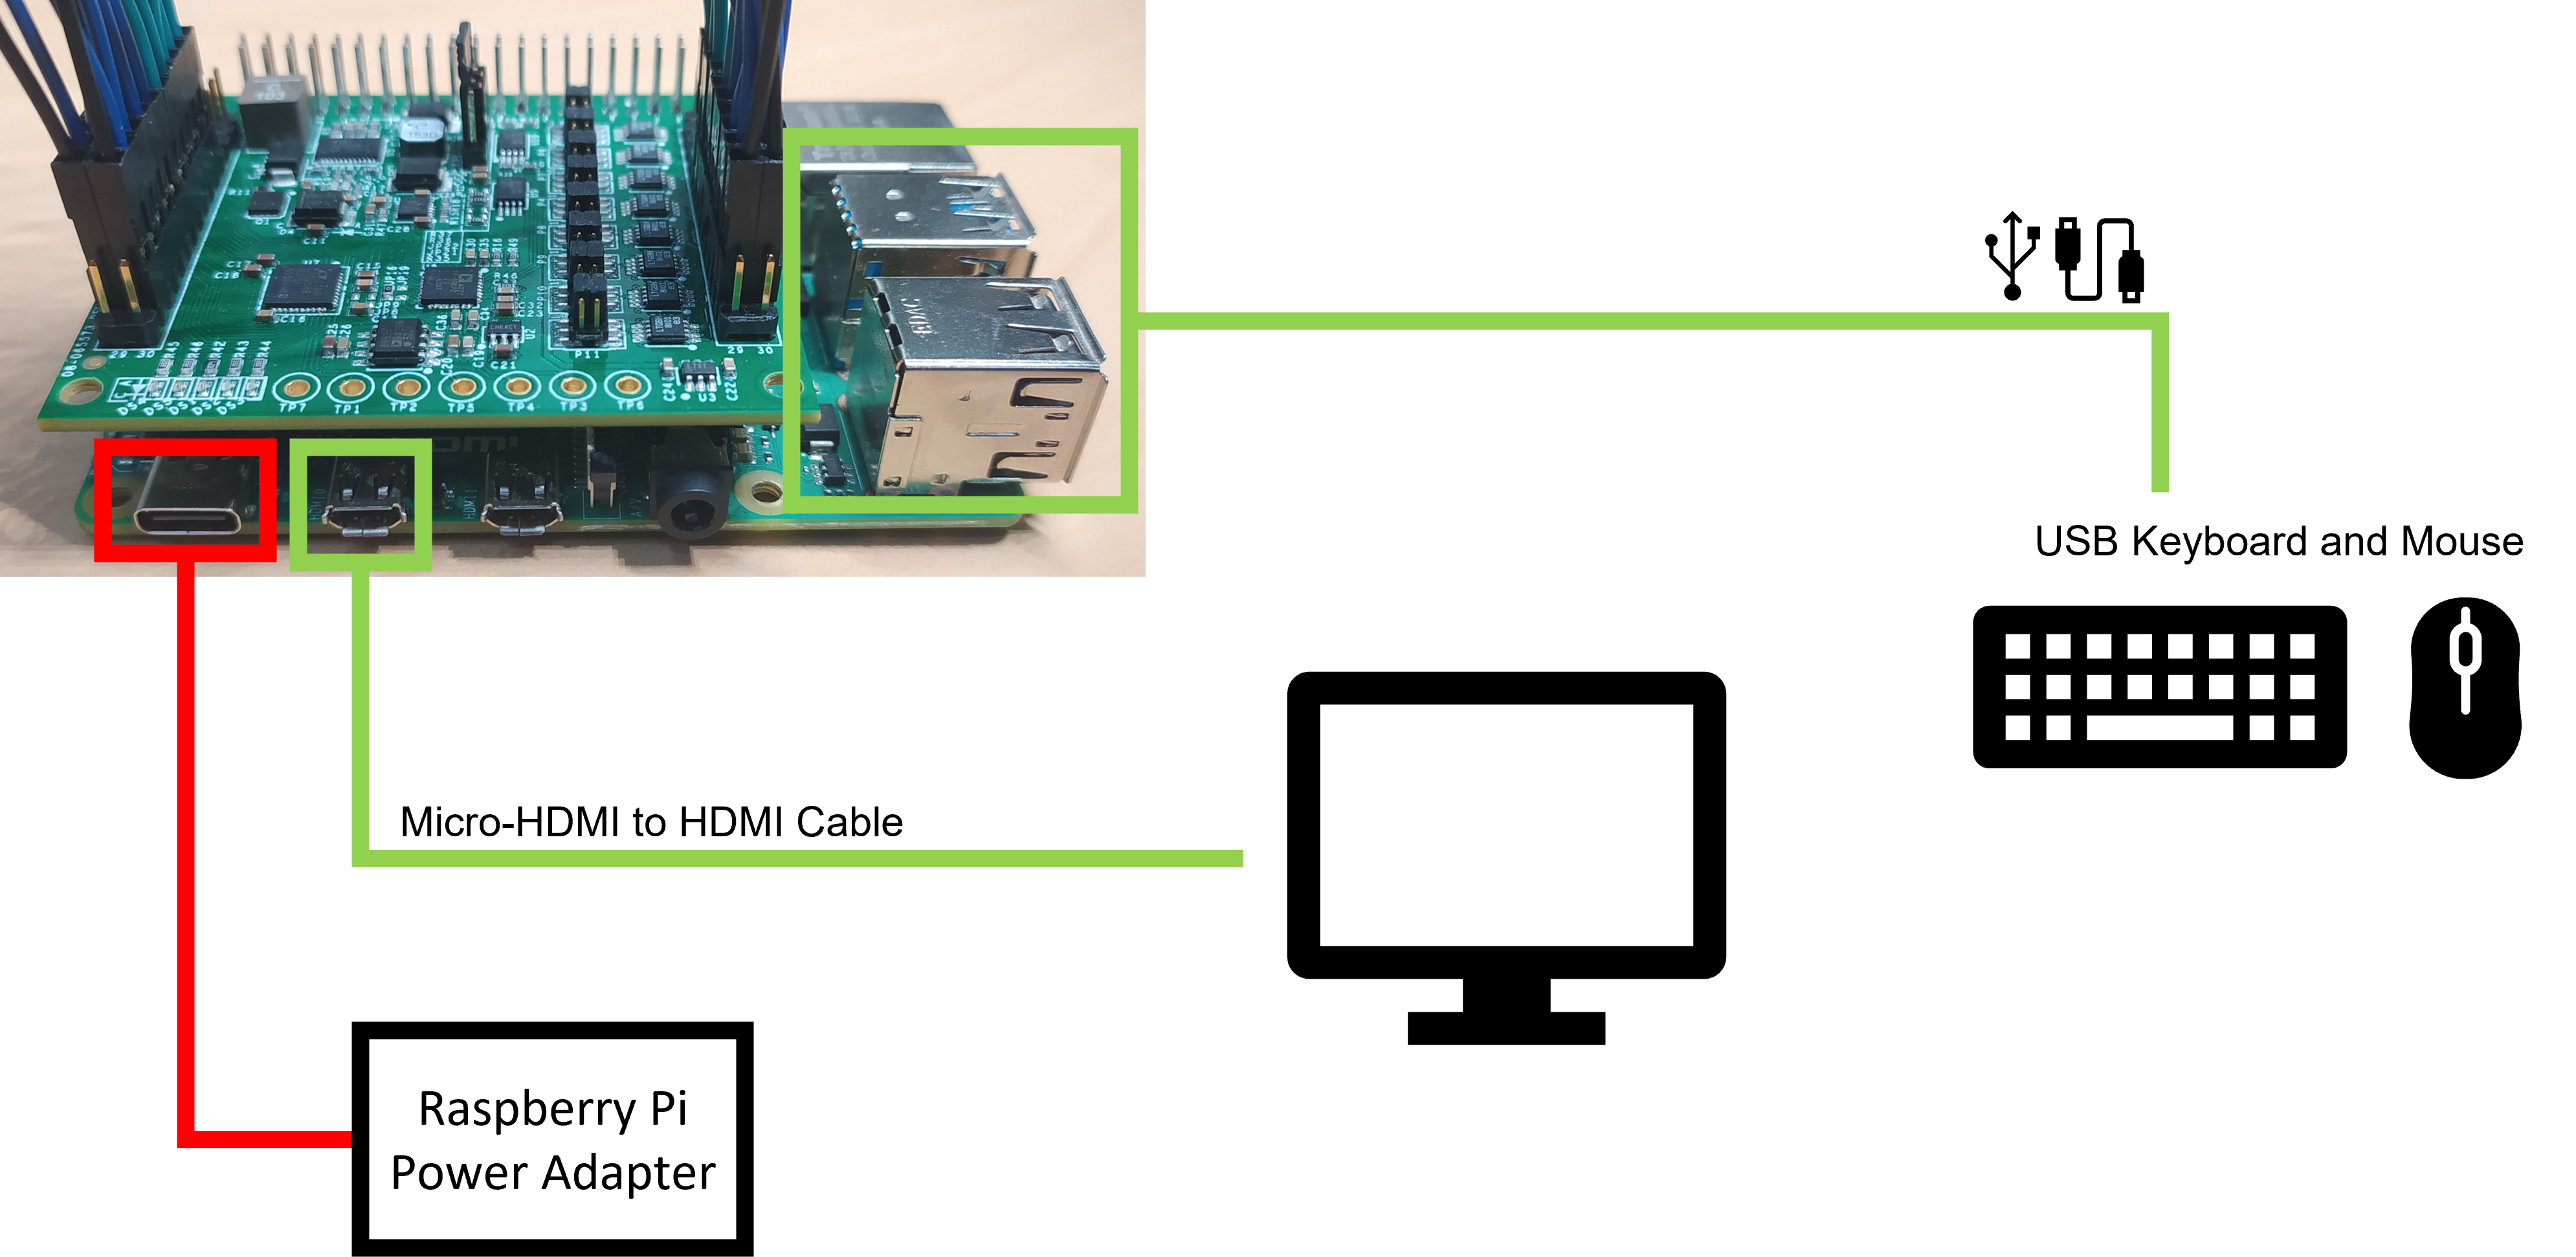
Connect the EVAL-CN0554-RPIZ to the Raspberry Pi through the 40-pin connector.
Insert the SD card with the correct ADI Kuiper Linux image to the Raspberry Pi 4 Model B.
Connect the corresponding ADC input and DAC output channel using the female-to-female loopback jumper cables as shown in the connection diagram and image below.
Connect HDMI of the Raspberry Pi 4 Model B to the display monitor, and then connect the keyboard and mouse to any of the former’s USB ports.
Power the Raspberry Pi 4 Model B using the USB Type-C power adapter and wait for the Raspberry Pi to boot up.
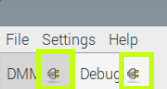
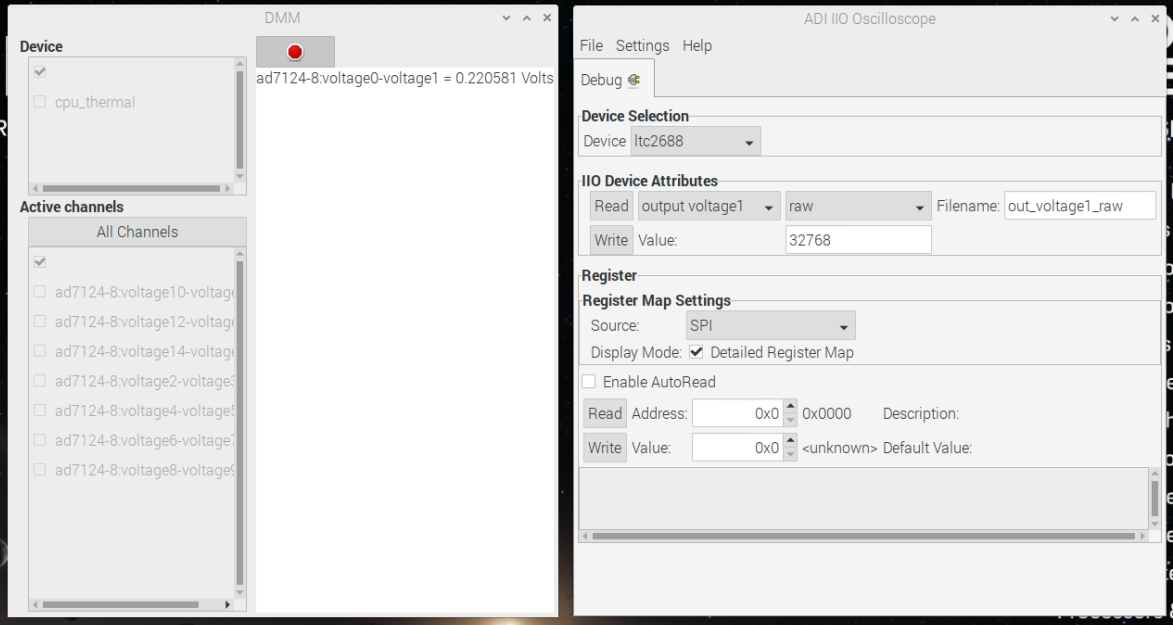
Open IIO Oscilloscope and undock the DMM and Debug tabs as shown below.
IIO Oscilloscope DMM and Debug Tabs
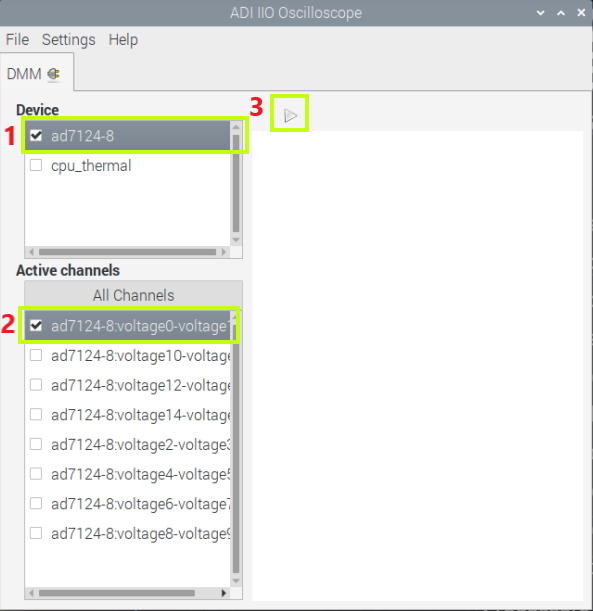
In the DMM Window, select the ad7124 as the device and select a channel to measure, such as ad7124-8:voltage0-voltage 1. Click on the Play button to start the measurement.
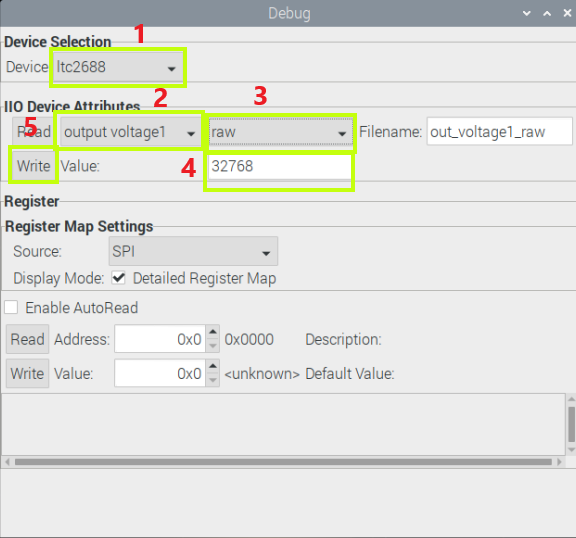
In the Debug Window, select ltc2688 in Device Selection. In the IIO Device Attributes section, select output voltage1 channel and select raw attribute. Set the value to 32768 and click Write. This should set the output voltage to around 2.5 V which is half of the default output range of 0 to 5 V.
The DMM measurement should show approximately 0.227 V or 1/11 of 2.5 V which is the default input voltage attenuation.
Software Setup
For the device to run, the SD card should be loaded with Analog Devices Kuiper Linux, a distribution based on Raspbian from the Raspberry Pi Foundation. It incorporates Linux device drivers for ADI products as well as tools and other software products designed and created with ease of use in mind. The reasoning behind creating this distribution is to minimize the barriers to integrating ADI hardware devices into a Linux-based embedded system.
Access to the embedded system can be through a remote PC connected either via LAN cable or Wi-Fi.
Downloading and Flashing Kuiper Linux Image on SD Card
In order to control the EVAL-CN0554-RPIZ from the Raspberry Pi, you will need to install ADI Kuiper Linux on an SD card. Complete instructions, including where to download the SD card image, how to write it to the SD card, and how to configure the system are provided at ADI Kuiper Linux. Write the image and follow the system configuration procedure.
Configuring the SD Card for the CN0554
For the Linux kernel to identify the device connected to the expansion header, update the device tree overlay. A Device Tree Overlay contains information about additional connected hardware, the EVAL-CN0554-RPIZ for this case. The overlay file is already included in the SD card and just needs to be matched to the EVAL-CN0554-RPIZ.
Follow the Hardware Configuration procedure under Preparing the Image: Raspberry Pi in the ADI Kuiper Linux page, substituting the following lines in config.txt:
This brings up the file in the terminal. Scroll down until the line that begins with “dtoverlay” is found; then, whatever it currently is, change it to:
Note
Need to add overlay here since it isn’t in Kuiper
dtoverlay=rpi-cn0554
Save the file by Ctrl + X command. Reboot the system by typing on the command prompt:
~$
sudo reboot
Graphical User Interface (GUI) and Example Python Scripts
There are two main tools which a user has the option to interact with the EVAL-CN0554-RPIZ.
Software Control and Diagnostics via IIO Oscilloscope
The EVAL-CN0554-RPIZ can be evaluated using IIO Oscilloscope. Customers can use the debug tab and the DMM tab. Various controls and diagnostics are available in these plug-ins.
Debug Tab
The debug tab provides direct access to IIO device and channel attributes, as well as the registers of the EVAL-CN0554-RPIZ components. The IIO attributes and registers can be read and written for advanced configuration and information.
DMM Tab
The DMM tab provides the ADC readings for the AD7124-8.
PyADI-IIO
PyADI-IIO is a python abstraction module for ADI hardware with IIO drivers to make them easier to use. This module provides device-specific APIs built on top of the current libIIO python bindings. These interfaces try to match the driver naming as much as possible without the need to understand the complexities of libIIO and IIO.
Running the Example
This demo uses a PyADI-IIO example script. This script will show the single-tone frequency with calibrated output power in dBm.
Connect the EVAL-CN0554-RPIZ to the Raspberry Pi.
Open command prompt or terminal and navigate through the examples folder inside the downloaded or cloned pyadi-iio directory.
Run the example script using the command.
…/pyadi-iio/examples $ python3 cn0554_example.py
Note
Update image, file name, and location
GitHub link for the python sample script: CN0554 Python Example
Schematic, PCB Layout, Bill of Materials
Download
EVAL-CN0554-RPIZ Design & Integration Files
Schematics
PCB Layout
Bill of Materials
Allegro Project
Additional Information and Useful Links
Reference Demos & Software
Hardware Registration
Receive software update notifications, documentation updates, view the latest videos, and more when you register your hardware. Register to receive all these great benefits and more!