Common Configurations of Phaser Hardware
The Phaser system consists of the RF Board, a Raspberry 4 (Rpi4) running ADI Kuiper Linux, and an ADALM-Pluto Rev C. However, due to the modular nature of these 3 components, there is some flexibility in how they are connected. This can be exploited for an optimal configuration, depending on the use case.
Note that, in all configurations, the Phaser is powered by a USB-C 5V supply connected to the RF board. This should be connected to the RF board, and not to the Rpi4. The RF board will then supply 5V to the Rpi4. Do not connect a USB-C power supply to both RF board and Rpi4 power ports. The power supply should be capable of supplying 3.5A. The official Rpi4 power supply has worked well, but the CanaKit 3.5A USB-C power supply is recommended. An underpowered, or faulty, power supply can manifest errors in a variety of ways in the Phaser system.

Standard Configuration
A simple configuration, and one recommended to start with, consists of:
Pluto connected, via micro USB cable, to the Rpi4
An HDMI monitor connected to the Rpi4’s mini HDMI port
A keyboard and mouse connected to the Rpi4’s USB ports
After following the standard Phaser SD card setup, no further installations are required. Making this the simplest setup to start with.
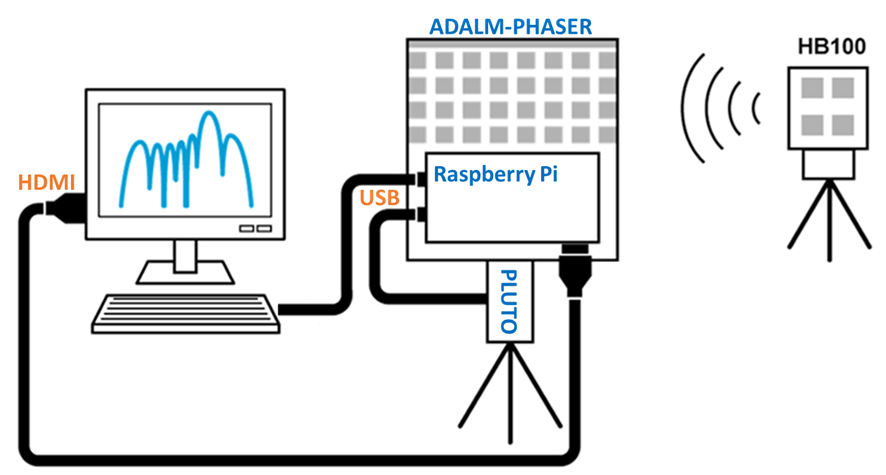
Radar Configuration
The radar configuration simply adds a transmit antenna to the OUT1 and/or OUT2 ports of Phaser’s RF Board. Most of the radar examples will use the OUT2 transmit port.

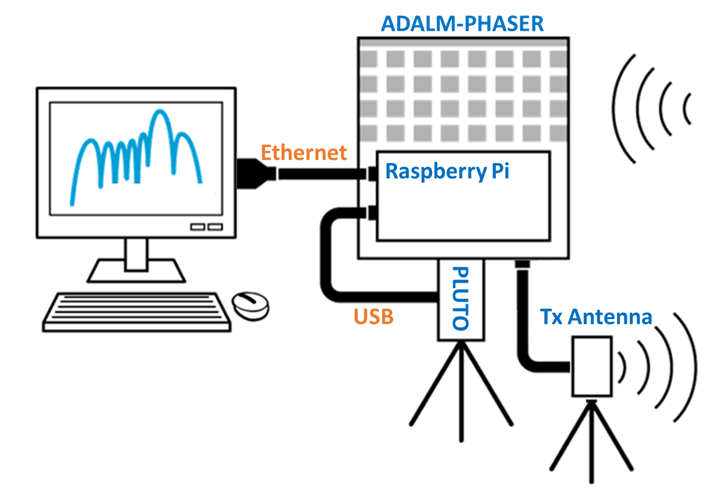
VNC Configuration
Instead of connected a monitor and keyboard to the Rpi4, the Phaser can be controlled by a remote computer via a VNC connection. In this configuration, an ethernet cable is connected from the computer to the Rpi4. That computer is then used for the display and control. However, all of processing is still performed on the Rpi4. The computer is simply displaying the Rpi4 desktop.
On the remote computer, Real VNC Viewer or Tight VNC, have worked well for the VNC connection to the Rpi4.
Host Computer Configuration
When greater processing power is required, or to use Phaser with applications such as MATLAB, then the “Host Computer Configuration” is used. In this configuration, the Pluto SDR’s micro USB cable is connected directly to the host computer, instead of to the Rpi4. This allows faster access to the streaming data of Pluto. And since all processing is done on the host computer, it offers far greater computational power. The Rpi4 is still used for all of the SPI and I2C transactions with the RF Board. And for this reason, an ethernet connection between the host computer and the Rpi4 is also required.
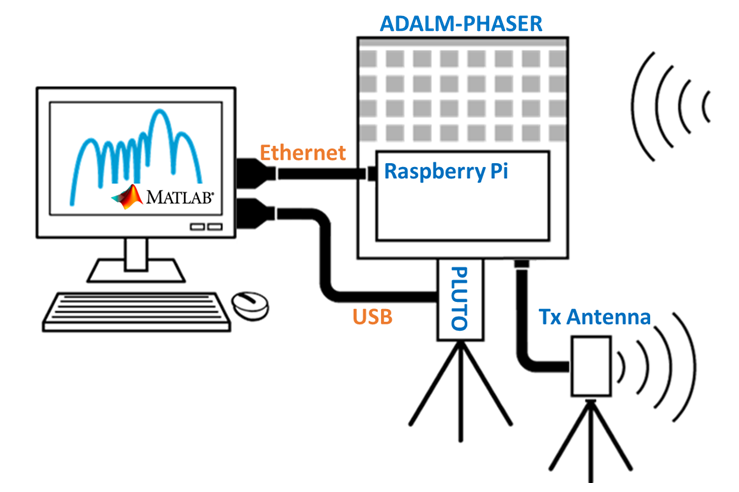
The Host Computer Configuration will require:
Installation of the ADALM-PLUTO drivers and LIBIIO library.
Instructions for this can be found here: https://wiki.analog.com/iioinstall
Installation of the either MATLAB or Python libraries to communicate with Phaser
MATLAB installation procedures are found on the “MATLAB Setup and Examples” the page
Python installation requires only the PYADI-IIO library to be installed to the Python IDE
Installation instructions are here: https://analogdevicesinc.github.io/pyadi-iio/guides/quick.html
Note
For questions or help with the Phaser, please visit: EngineerZone