GNU Radio and IIO Devices: gr-iio
GNU Radio is a free & open-source software development toolkit that provides signal processing blocks to implement software radios or other generic processing. This articles focuses on using IIO based devices like PlutoSDR, AD-FMCOMMS2-EBZ, AD-FMCOMMS3-EBZ, AD-FMCOMMS4-EBZ, ARRADIO and AD-FMCOMMS5-EBZ within GNU Radio itself. This support is currently provided in an out-of-tree (OOT) module called gr-iio.
Warning
If you are using gnuradio 3.10 or newer gr-iio is already provided within the base install of gnuradio itself. 3.9 is not supported in any form by gr-iio.
Linux Installation
Dependencies
gr-iio requires a few main dependencies:
Since GNU Radio can come from many different sources and with many different packages includes we will try to cover all the necessary dependencies but this can differ depending on OS packaging. If you have built and installed gnuradio from source yourself you should be good to go. Otherwise, consult the GNU Radio Wiki for further documentation on the development installation.
Most dependencies do have pre-built binaries available on github (libiio releases, libad9361 releases) or can be build from source as below.
Download and build libiio
Libiio requires the following packages:
libxml2
libxml2-dev
bison
flex
cmake
git
libaio-dev
Install with apt:
(sudo) apt install libxml2 libxml2-dev bison flex cmake git libaio-dev libboost-all-dev
If you want the documentation for the C API you will require doxygen:
(sudo) apt install doxygen
If you want the USB backend add libusb support:
(sudo) apt install libusb-1.0-0-dev
If you want zeroconf add avahi support:
(sudo) apt install libavahi-common-dev libavahi-client-dev
Build and install libiio from source:
git clone https://github.com/analogdevicesinc/libiio -b v0.25
cd libiio
mkdir build
cd build
cmake .. -DPYTHON_BINDINGS=ON
make
sudo make install
cd ../..
Download and build libad9361-iio
Build and install libad9361-iio from source:
git clone https://github.com/analogdevicesinc/libad9361-iio
cd libad9361-iio
mkdir build
cd build
cmake .. -DPYTHON_BINDINGS=ON
make
sudo make install
cd ../..
GNU Radio and gr-iio
If you did not install libiio from source you will need the following packages as well:
bison
flex
cmake
git
libgmp-dev
Install with apt:
(sudo) apt install bison flex cmake git libgmp-dev
For GNU Radio 3.7+ to enable python support requires swig:
(sudo) apt install swig
GNU Radio 3.7
Important
We would highly recommend upgrading to gr-3.8+. gr-iio was accepted into mainline gnuradio and will be directly provided with it from 3.10+
On Ubuntu 16.04 or newer GNU Radio can be installed from the package management. The installed version should be compatible with the gr-iio package build from source. Libiio and gr-iio may also be available from the package management, but to get the latest and most feature complete work, its recommend to build it from the latest github sources.
git clone https://github.com/analogdevicesinc/gr-iio
cd gr-iio
cmake .
make
sudo make install
cd ..
sudo ldconfig
GNU Radio 3.8
Since GNU Radio 3.8 is not fully mainstream across package managers 3.8+ support requires a non-master branch, specifically upgrade-3.8. To get GNU Radio 3.8+ consult the GNU Radio Wiki - Ubuntu PPA Installation.
gr-iio in 3.8+ requires liborc-dev
(sudo) apt install liborc-dev
Build and install gr-iio from source:
git clone -b upgrade-3.8 https://github.com/analogdevicesinc/gr-iio
cd gr-iio
cmake .
make
sudo make install
cd ..
sudo ldconfig
GNU Radio 3.8.2
GNU Radio 3.8.2 is already installed on the latest Kuiper version, but if for some reason you have to install it, here is how:
apt-get update
apt install gnuradio -y
ldconfig
Post installation
For 3.7, GNU Radio will recommend you include
/usr/local/lib${type}/python${PYVER}/site-packages/gnuradio or
/usr/local/lib${type}/python${PYVER}/dist-packages/gnuradio in your
PYTHONPATH during installation. If this is not the case you will need to modify
the cmake command for the gr-iio configuration above with:
cmake -DCMAKE_INSTALL_PREFIX=/usr .
For 3.7, certain binary installs of GNU Radio, python binding are placed in a competing folder to GNU Radio’s built-in blocks. This may require you to manually copy blocks between the /usr/lib and /usr/local/lib. If you receive import error for iio_swig this is likely the case. To remedy this move the blocks between the necessary folders:
cp -r /usr/local/lib/python2.7/dist-packages/gnuradio/iio /usr/lib/python2.7/dist-packages/gnuradio/
This is due to the iio python blocks being placed in the gnuradio subfolder. This is required since the iio language binding for python would overwrite these blocks.
For 3.8, make sure the gr-iio swig interface is on your PYTHONPATH. Otherwise, you will get import errors in python. The common command would be (depending on OS and install location):
export PYTHONPATH=$PYTHONPATH:/usr/lib/python{PYTHON VERSION}/{site or dist}-packages
The added path is the location of the newly installed iio folder.
For 3.8.2 no additional steps have to be taken
On the latest ADI image
GNU Radio and the gr-iio blocks are installed by default. If you want to install GNU Radio on your host consult the official GNU Radio Wiki.
Windows Support
The current recommended way to use GNU Radio under Windows is with the Windows Subsystem for Linux (WSL). To install WSL follow the instructions from Microsoft here: How to install Linux on Windows with WSL . Please install Ubuntu when selecting an operating system. Note that GR 3.7 has only been tested on WSL.
Once Ubuntu is up and running go to the Linux Installation section above and proceed with “the preferred way” install, which will be much faster than pybombs.
Once all the blocks are installed an X11 server will need to be install on Windows itself so we can use GNU Radio’s GUI tools. Download and install Xming in Windows.
Next back in Ubuntu, add the following to your .bashrc file:
DISPLAY=:0.0
export DISPLAY
Then in Ubuntu source the file with command source ~/.bashrc
Next, launch Xming in Windows which should only add an icon to your taskbar tray.
Finally, launch GNU Radio Companion from Ubuntu with command
gnuradio-companion. This should launch the familiar GUI for GNU Radio.
Native
A complete GNU Radio installer with gr-iio support is provided for Windows 7/10. Please read the entire linked page before installing.
Blocks
Using the FMCOMMS-2/3/4 blocks

Note
Although the GNU Radio block is called “FMCOMMS-2”, it will work with the any of the AD-FMCOMMS[234], ADRV9361, ADRV9364, ADRV9363 or ARRADIO boards. The FMCOMMS-2 IIO blocks can run over the IP network or USB. By setting the “IIO context URI” parameter to the IP address of the target board, you can stream samples from/to the remote board. It should be preferred when possible, as it is faster, knowing that the target board does not have the processing power of your PC.
Common
IIO context URI: Set to “local:” if using GNU Radio locally on the target e.g. Zedboard. If using GNU Radio remote on a PC, set the target IP address using ip:XXX.XXX.XXX.XXX (some boards like the PlutoSDR run a Zeroconf/Avahi deamon so the the URI may look like this: ip:pluto.local) or via USB using the URI usb:XX.XX.XX
Buffer size: Size of the internal buffer in samples. The IIO blocks will only input/output one buffer of samples at a time.
Source Block

RF Bandwidth(MHz): Configures RX analog filters: RX TIA LPF and RX BB LPF. Read More
Sample Rate(MSPS): Frequency at which the hardware will input/output samples. Read More
LO Frequency(MHz): Selects the RX local oscillator frequency. Range 70MHz to 6GHz with 1Hz tuning granularity. Read More
RF Port Select: Selects the RF port to be used. Can be either any of the inputs on the Rx input mux (in single ended or differential) or the Tx monitor input. Read More
Tracking Read More
Quadrature
RF DC
BB DC
Manual Gain(dB): Controls the RX gain only in Manual Gain Control Mode (MGC). Read More
Gain Mode (RX1, RX2): Selects one of the available modes: manual, slow_attack, hybrid and fast_attack. Read More
RX1/RX2 Enabled: Enables the receive data path
Filter: Allows a FIR filter configuration to be loaded from a file. Read More
Filter auto When enabled loads a default filter and thereby enables lower sampling / baseband rates.
Sink Block

RF Bandwidth(MHz): Configures TX analog filters: TX BB LPF and TX Secondary LPF. Read More
Sample Rate(MSPS): Frequency at which the hardware will input/output samples. Read More
LO Frequency(MHz): Selects the TX local oscillator frequency. Range 70MHz to 6GHz with 1Hz tuning granularity. Read More
RF Port Select: Selects the RF port to be used. Read More
Attenuation(RX1, RX2)(dB): Individually controlls attenuation for TX1 and TX2. The range is from 0 to -89.75 dB in 0.25dB steps. Read More
Cyclic: Set to “true” if the “cyclic” mode is desired. In this case, the first buffer of samples will be repeated on the enabled channels of the FMCOMMS-2 until the program is stopped. The FMCOMMS-2 IIO block will report its processing as complete: the blocks connected to the FMCOMMS-2 IIO block won’t execute anymore, but the rest of the flow graph will.
TX1/TX2 Enabled: Enables the transmit data path
Filter: Allows a FIR filter configuration to be loaded from a file. Read More
Filter auto When enabled loads a default filter and thereby enables lower sampling / baseband rates.
Using the PlutoSDR blocks

Common
IIO context URI: Set to “local:” if using GNU Radio locally on the target e.g. Zedboard. If using GNU Radio remote on a PC, set the target IP address using ip:XXX.XXX.XXX.XXX (some boards like the PlutoSDR run a Zeroconf/Avahi deamon so the the URI may look like this: ip:pluto.local) or via USB using the URI usb:XX.XX.XX
Buffer size: Size of the internal buffer in samples. The IIO blocks will only input/output one buffer of samples at a time.
Source Block

RF Bandwidth(MHz): Configures RX analog filters: RX TIA LPF and RX BB LPF. Read More
Sample Rate(MSPS): Frequency at which the hardware will input/output samples. Read More
LO Frequency(MHz): Selects the RX local oscillator frequency. Range 70MHz to 6GHz with 1Hz tuning granularity. Read More
Tracking Read More
Quadrature
RF DC
BB DC
Manual Gain(dB): Controls the RX gain only in Manual Gain Control Mode (MGC). Read More
Gain Mode: Selects one of the available modes: manual, slow_attack, hybrid and fast_attack. Read More
Filter: Allows a FIR filter configuration to be loaded from a file. Read More
Filter auto When enabled loads a default filter and thereby enables lower sampling / baseband rates.
Sink Block
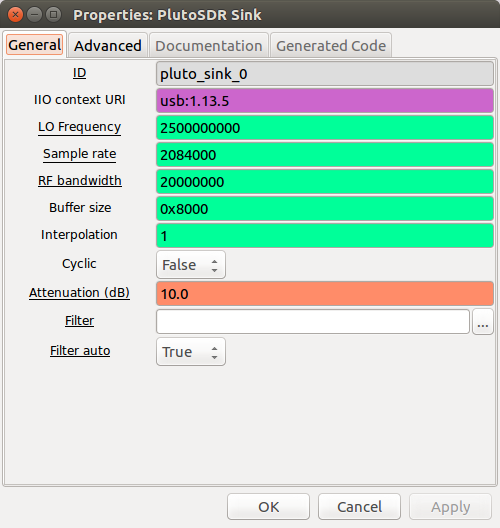
RF Bandwidth(MHz): Configures TX analog filters: TX BB LPF and TX Secondary LPF. Read More
Sample Rate(MSPS): Frequency at which the hardware will input/output samples. Read More
LO Frequency(MHz): Selects the TX local oscillator frequency. Range 70MHz to 6GHz with 1Hz tuning granularity. Read More
RF Port Select: Selects the RF port to be used. Read More
Attenuation (dB): Individually controlls attenuation for TX1 and TX2. The range is from 0 to -89.75 dB in 0.25dB steps. Read More
Cyclic: Set to “true” if the “cyclic” mode is desired. In this case, the first buffer of samples will be repeated on the enabled channels of the FMCOMMS-2 until the program is stopped. The FMCOMMS-2 IIO block will report its processing as complete: the blocks connected to the PlutoSDR IIO block won’t execute anymore, but the rest of the flow graph will.
Filter: Allows a FIR filter configuration to be loaded from a file. Read More
Filter auto When enabled loads a default filter and thereby enables lower sampling / baseband rates.
IIO Examples
Several sample flow graphs that use the FMCOMMS-2/3/4 IIO blocks are provided in our GNU Radio repository. They can be found in the “iio-example” folder.