Expand the Frequency and RF Ports
There’s a number of ways you can customize your PlutoSDR. Most of these are detailed here. In this guide, we’ll walk through the two most popular customizations: increasing the frequency range and adding a second transmit and receive channel.
Both of these customizations require logging into the command line terminal of Pluto. This is easily accomplished with an SSH or serial connection, as explained here.

Remember the username is root, password is analog
Increasing the Frequency Range
By default, your PlutoSDR has an LO tuning range of 325–3800 MHz and a maximum instantaneous bandwidth of 20 MHz. These are the specifications over which the PlutoSDR is guaranteed to operate. However, this range can be extended to 70 MHz to 6 GHz, with a bandwidth of up to 56 MHz. These extended ranges generally work well, but keep in mind that performance is not guaranteed.
To enable this wider frequency range, enter in these commands:
fw_setenv attr_name compatible
fw_setenv attr_val ad9364
reboot
After rebooting, log back into Pluto and see if the commands took effect. If attr_val returns “ad9364”, then it worked!

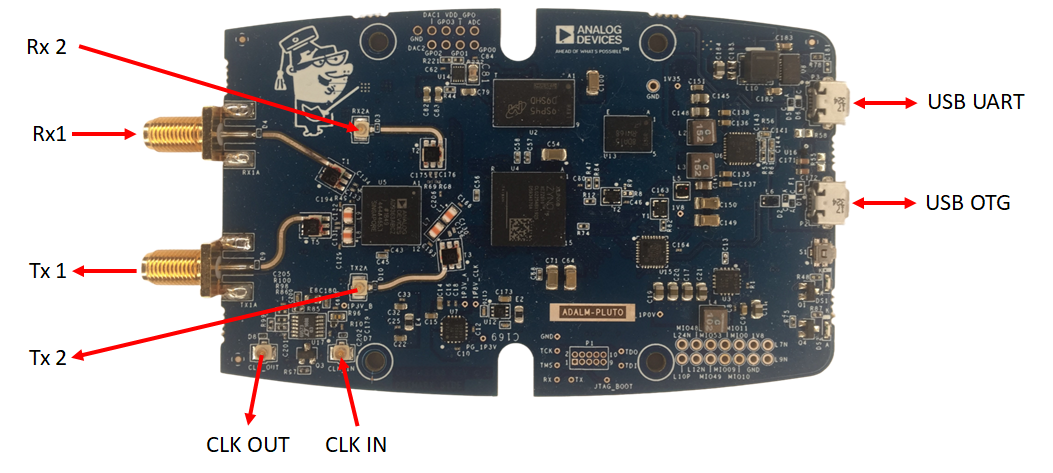
Adding a Second Rx and Tx Channel
By default, your PlutoSDR comes with one transmit channel and one receive channel. These are connected to the SMA ports in the case. However, you can open up the PlutoSDR and connect another transmit and receive channel. Note that this only works for Rev C, or later, of PlutoSDR (look on the back of your Pluto). You’ll also need the latest firmware – i.e. rev 0.39 or later.
The main downside to enabling the second channel is that the maximum sample rate is reduced from 61.44 MSPS to 30.72 MSPS. With twice the number of channels, the sample rate is halved. This is a unique limitation of the PlutoSDR (due to its CMOS digital data output). This limitation does not apply to the AD9361 SOM, which is designed to support two channels at 61.44 MSPS
Here’s a complete video walkthrough of how to open up your Pluto, add the correct cables, and configure Pluto:
Once you’ve made those hardware changes, you can now configure the Pluto software to recognize the second transmit and receive ports. At the command line, enter:
fw_setenv attr_name compatible
fw_setenv attr_val ad9361
fw_setenv compatible ad9361
fw_setenv mode 2r2t
reboot
After rebooting, log back into Pluto and see if the commands took effect. If attr_val returns “ad9361” and mode returns “2r2t”, then it worked!

If you ever needed to switch back to the 1T/1R mode (for example to operate Pluto at > 30.72 MSPS), then simply set the values back to 1r1t and AD9364.
If you have access to a 3D printer, you can print this panel for PlutoSDR. It replaces the normal faceplate, and provides two additional spots for the SMA bulkhead connectors:

Note
For questions or help with the Pluto SDR, please visit: EngineerZone